Showing posts with label Battle of Sourton Down. Show all posts

Tuesday, March 28, 2023

Summing Up Sourton Down

NOT only was Sourton Down the first battle in these refights won by the Royalists, but the AI now leads the series 3-2.
I am not sure what went wrong from my perspective - certainly the fall of the dice seemed fairly even.
But I suspect the battle my have been lost early on, when I perhaps advanced too slowly.
Then again, I have in earlier battles experienced the disadvantages of charging forward with inadequately supported cavalry.
The bottom line, as usual, is that I thoroughly enjoyed the experience, despite losing.

Monday, March 27, 2023

Sourton Down Play-Through: Turn Nine

Situation at the end of turn eight
My five dice give me 6, two 4s, 2 and 1. I reroll the 4s, getting 6 and another 4.
I use the 6s to rally the two units of horse, advance the further-forward muskets and use my pikes to charge the enemy pikes beside the high ground.
The pikes need 8+, reduced by one thanks to horse support, but roll 5.
It is clearly impossible for the Parliamentarians to eliminate four Royalist units next turn, so I concede the battle

Sunday, March 26, 2023

Sourton Down Play-Through: Turn Eight

Situation at the end of turn seven
My five dice give me 6, 4, 3 and two 2s.
I use the 6 to rally the fleeing muskets, and give move orders to all except the other unit of muskets.
The righthand horse charge the nearer enemy muskets, needing 6+, reduced by one thanks to support from pikes. I roll 7, forcing the muskets to flee to the edge of the battlefield.
My pikes advance, so they can give support when the lefthand horse charge the muskets in the trees. Cavalry charging muskets normally need 6+, but here it is increased by one thanks to the defenders being in cover, but reduced by two thanks to support from pikes and the other horse unit. I roll 9, forcing the muskets off the battlefield.
Five units each
The righthand artillery need 9+ to hit the horse in their line-of-fire, increased by one thanks to intervening trees, but reduced by one thanks to support from pikes. The AI rolls 11, demoralising my horse and forcing them back two hexes.
The other artillery fail to get the 8+ needed to hit my further-forward muskets.
The surviving, but demoralised Royalist muskets, fail to rally and so flee the battlefield.
The righthand pikes advance towards my good-order horse, who are promptly charged by the other pikes.
It is 50-50 whether the charging pikes do so by advancing down the map or obliquely right. A die mandates the latter, which is a smart move as it leaves room for the other pike unit to lend support.
Pikes attacking horse require 7+, reduced by one thanks to the support. The AI rolls 7, demoralising my horse and forcing them back a hex.
I fear the Parliamentarian ambush has passed its high-water mark

Saturday, March 25, 2023

Sourton Down Play-Through: Turn Seven

Situation at the end of turn six
My five dice give me 6, two 4s, 2 and 1. I reroll the 4s in the hope of getting a move order (1-2-3) and an attack order (4-5-6), and do indeed get 3 and 6.
I allocate 6s to the musket units, and move orders to the rest.
Both horse units advance, and then I charge with my pikes against the Royalist pikes in front of them, needing 8+, reduced by three thanks to support from two units of horse and one of muskets.
I roll 7, demoralising the enemy pikes and forcing them to the edge of the battlefield.
My lefthand muskets fire at the pikes nearest them, needing 8+, reduced by two thanks to support from muskets and horse, and reduced by a further one thanks to being on higher ground.
I roll 11, forcing the pikes from the battlefield.
Royalists are being forced back, but it is surely too little, too late
The righthand artillery roll a miserable 2, but the other cannon unit rolls exactly the 8 needed to demoralise my further-forward muskets.
The further-back Royalist muskets advance, but only one of the two demoralised pike units rallies before fleeing the battlefield. The other pike unit advances.
There is a glimmer of hope for the Parliamentarians as, in the confusion of being ambushed, the Royalist pikes have left their musketeer comrades in vulnerable positions

Friday, March 24, 2023

Sourton Down Play-Through: Turn Six

Situation at the end of turn five
My five dice give me two 6s, two 2s and 1.
I use one 6 to rally the demoralised horse and give the other to the forward muskets. I advance the remaining units and fire at the nearest enemy pikes, needing 6+ thanks to support from pikes and horse.
I roll exactly 6, demoralising the Royalist pikes.
I feel like resigning already
Neither unit of artillery finds its mark, and neither unit of Royalist muskets advances.
The demoralised pikes fail to rally, rolling a 4 instead of the needed 5+, and so flee two more hexes, but two other units of pikes advance.
Situation at the end of turn six

Thursday, March 23, 2023

Sourton Down Play-Through: Turn Five

Situation at the end of turn four
My six dice give me three 4s, 3, 2 and 1. I desperately need a 6 - the only score that will rally a human player's demoralised unit - so I reroll the 4s, getting a 6 and two more 4s.
I duly rally the demoralised horse, and move the lefthand horse away from the pikes opposite them and towards the furthest-forward Royalist muskets.
My righthand muskets advance, and the righthand horse charge the nearest enemy muskets, entering wood to do so, which will give cover when the Royalists respond.
The horse need 6+, reduced by two thanks to support from units of horse and muskets. I roll 10, sending the muskets fleeing from the battlefield.
Halfway through the battle - it is not looking good for the Parliamentarian cause
The righthand artillery shoot at my horse in their line-of-fire, needing 9+, increased by one thanks to intervening trees, but decreased by one as there is support from muskets. They roll 11, demoralising my men and forcing them back two hexes to the edge of the battlefield.
The other artillery miss, rolling three short of 8+ needed to hit muskets.
The Royalist muskets in trees fire at my horse in trees, requiring 10+ thanks to the horse being in cover, but reduced by three thanks to support from muskets and two units of pikes. They roll exactly the 7 needed to demoralise my men.
The other unit of muskets fires with the same parameters, rolling a resounding 12 and so destroying my horse (a hit on a demoralised unit is always fatal).
Only one unit of pikes advances, but the demoralised pikes rally on a throw of 5, narrowly avoiding fleeing the battlefield.
Situation at the end of turn five

Wednesday, March 22, 2023

Sourton Down Play-Through: Turn Four

Situation at the end of turn three
My six dice - I have lost a unit - give me 5, two 4s, 3, 2 and 1. I reroll the 4s, but get two 6s.
I allocate a 5 to the lefthand muskets, and give move orders to the three units nearest them.
First I move up the righthand muskets so they can give support to my planned attack on the furthest-forward Royalist pikes, which I then charge with my lefthand horse.
Cavalry attacking pikes require 9+ for a hit, in this case reduced by three thanks to support from two units of muskets and one of horse, all of whom are within attack distance of the pikes.
I roll 8, demoralising the pikes and forcing them back two hexes (the difference between my required roll and what I actually threw).
My central horse take a gamble and charge the Royalist pikes by the trees, needing 9+, reduced to 6+ thanks to support from two units of horse and one of muskets. I roll 7, demoralising the pikes and forcing them back a hex.
The Parliamentarians have had some small but much-needed success
The righthand artillery has no target, while the lefthand artillery rolls 8, which would normally be one less than the score needed to hit cavalry, but thanks to support from three units of muskets, only 6 is needed, so the cavalry are demoralised and flee to the edge of the battlefield.
The furthest-forward muskets fire at my remaining pikes - their preferred target over equally near horse - but roll 6, two less than needed. The other muskets stand firm.
One unit of demoralised pikes flees to the edge of the battlefield, but the other rallies on a throw of 5 (the minimum needed), and the remaining pikes advance.
The Royalist army seems to have recovered some of its shape

Tuesday, March 21, 2023

Sourton Down Play-Through: Turn Three

Situation at the end of turn two
My seven dice give me 6, 5, 4, two 2s and two 1s. I cannot reroll the three attack orders as they are different numbers (it is only possible to reroll two or more dice that show the same number).
I allocate two of the move orders to the horse and pikes that are in danger of being charged by pikes or fired at by muskets, and the other two move orders to the pikes and muskets that are in the same column.
So far, so cagey
First blood goes to the Royalists when their lefthand cannon hits my pikes in their line-of-fire, rolling 10, two more than the 8+ required, so forcing the pikes to flee the battlefield.
Two of the musket units advance, as do two the pike units.
The Royalist units are not coordinating their movement - perhaps the shock of being ambushed is having an effect

Monday, March 20, 2023

Sourton Down Play-Through: Turn Two

Situation at the end of turn one
My seven dice give me three 6s, two 3s, 2 and 1. I reroll the 6s, getting 5, 3 and 1.
I give move orders to every unit except the central horse, and generally send the Parliamentarian forces to the right, and so away from the mass of Royalist pikes.
My men have to cross the artillery units' line-of-fire, but will hopefully reach the high ground on the Parliamentarian right flank
Neither artillery unit scores a hit, although the lefthand one narrowly misses, rolling one short of the required 8.
Again only one musket unit advances, and only two pike units.
Situation at the end of turn two

Sunday, March 19, 2023

Sourton Down Play-Through: Introduction & Turn One

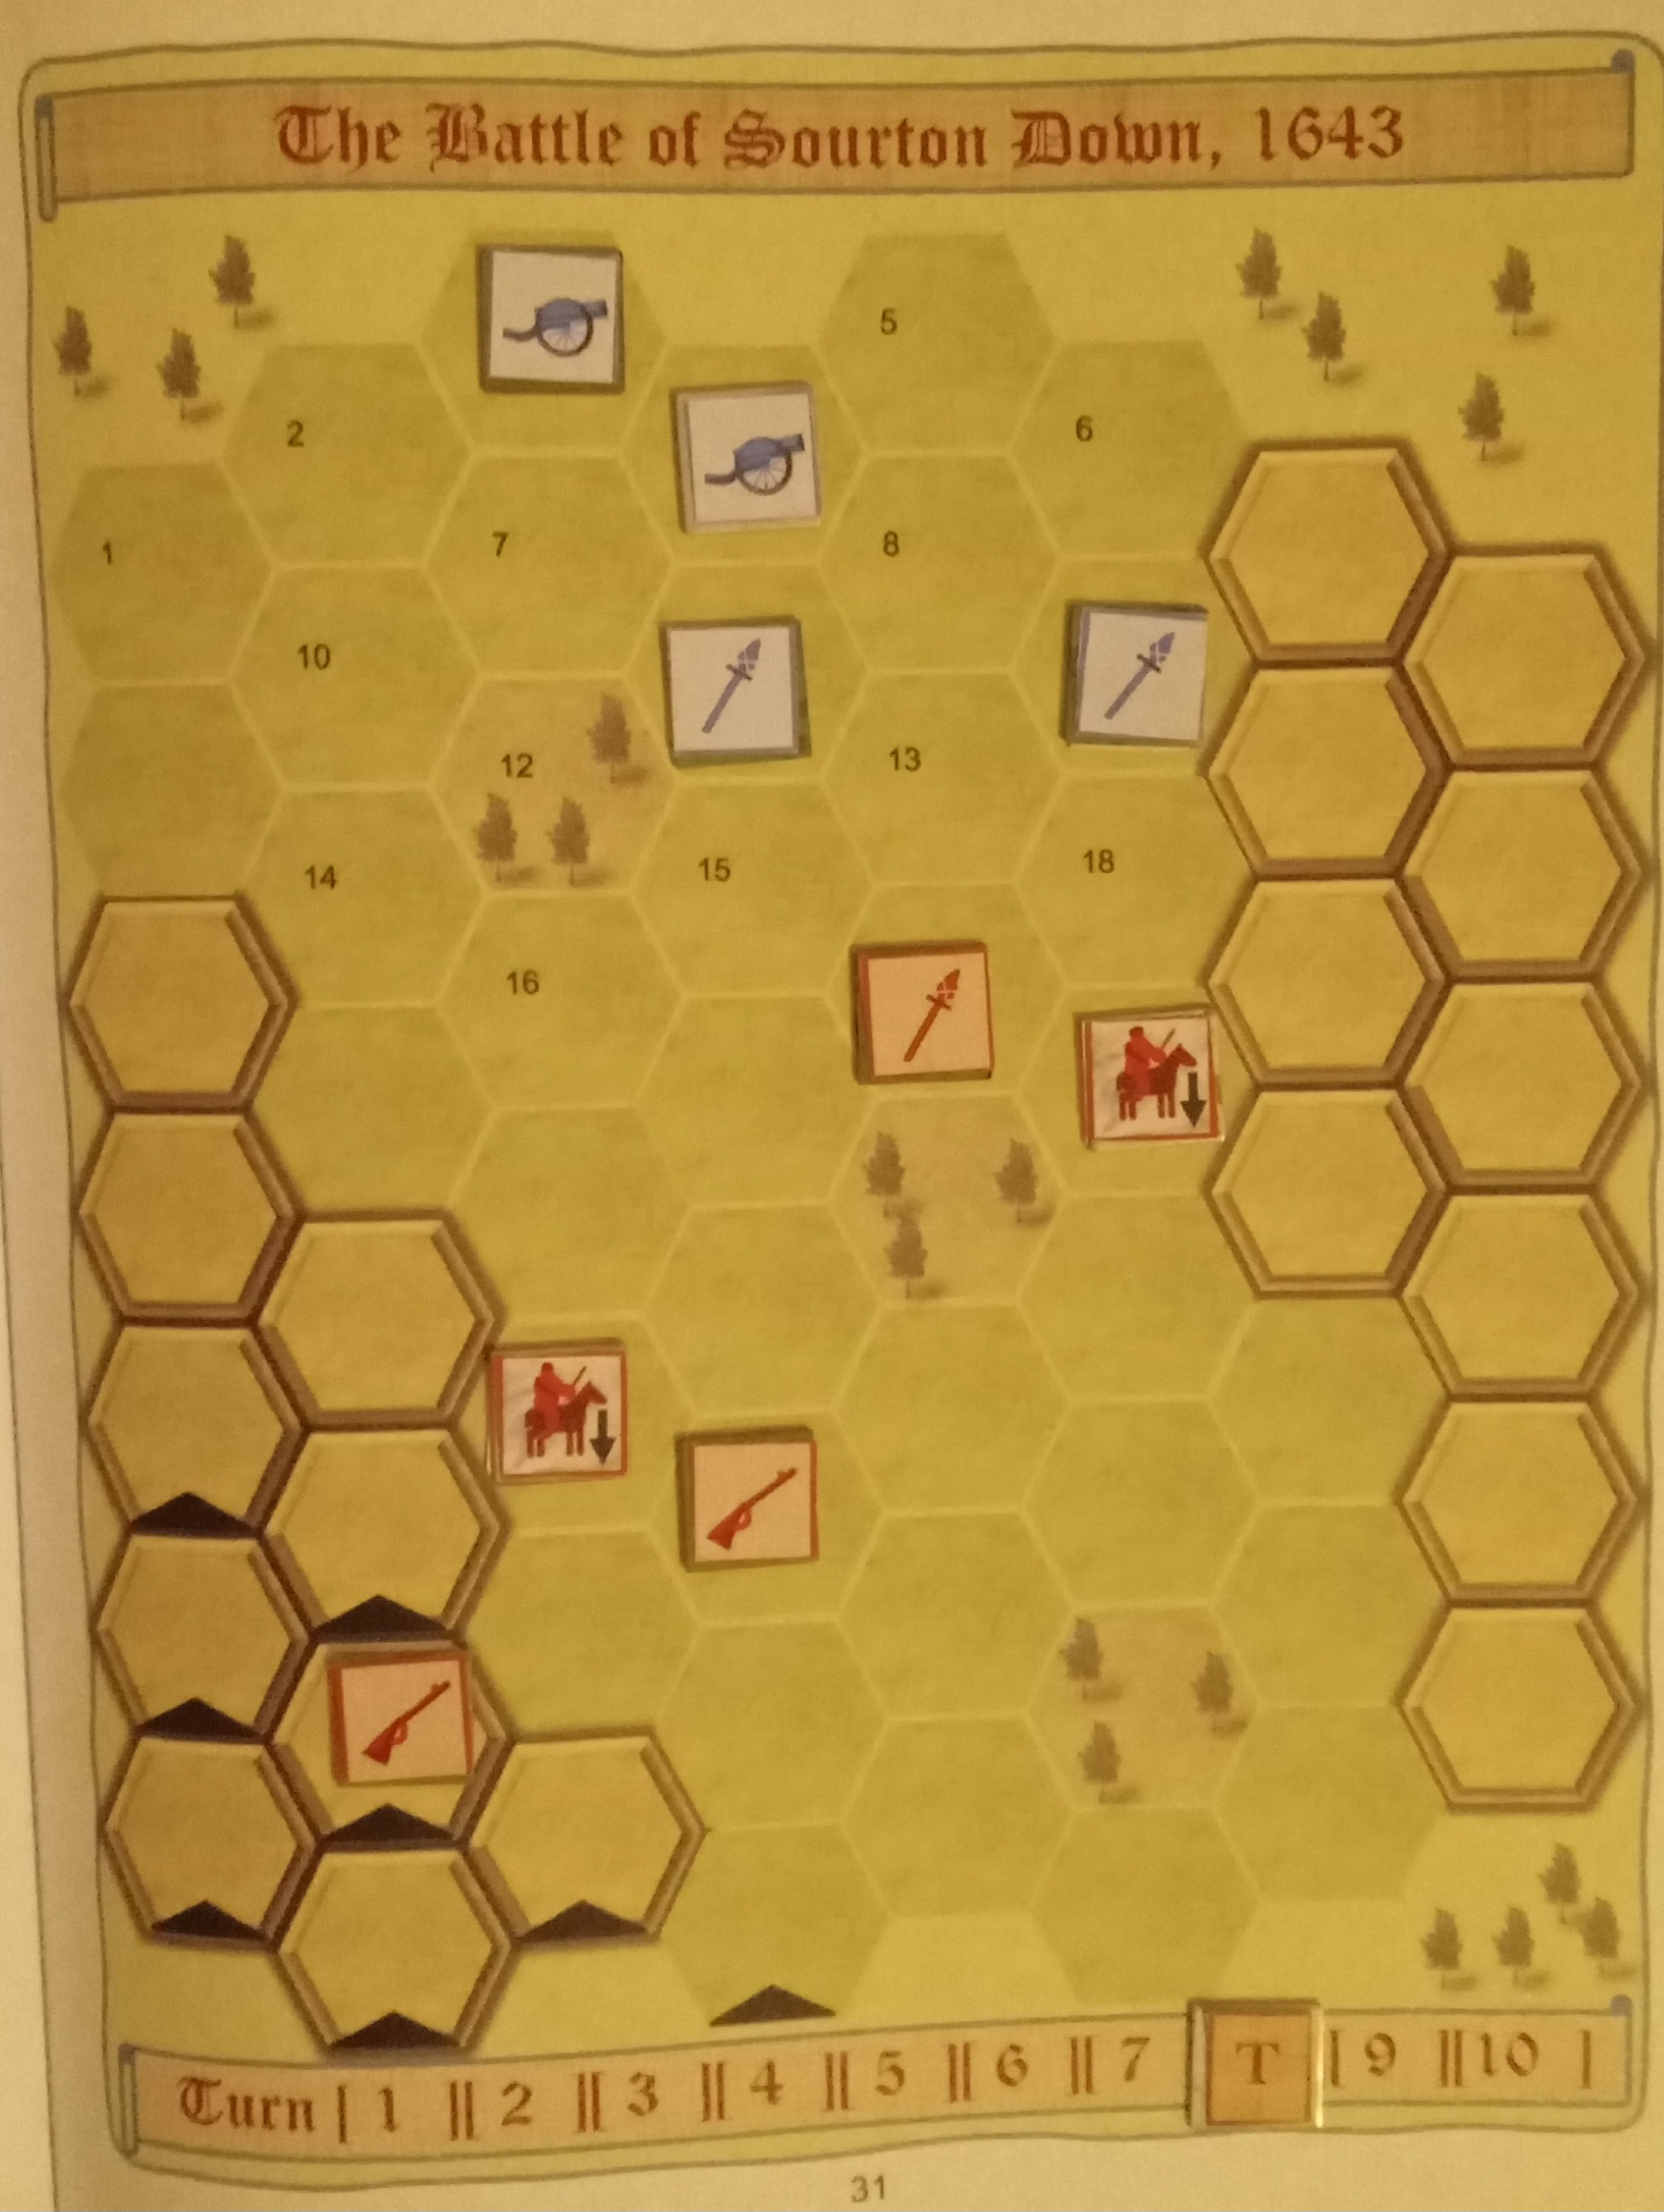
THE Battle of Sourton Down in April 1643 was an ambush by Parliamentarians under Sergeant-Major-General James Chudleigh against a much larger Royalist force commanded by Sir Ralph Hopton.
Most of the Royalist army was routed by a small number of Parliamentarian horse, but support from Parliamentarian foot was lacking after the latter came under fire from Royalist artillery.
The Parliamentarians retreated because they knew they were still heavily outnumbered despite their early successes, while the Royalists also retreated, not realising their numerical superiority.
In Mike Lambo's refight the human commands a Parliamentarian force consisting of three units of horse, two of pikes and two of muskets.
I have gone for a historical set-up with cavalry to the fore
The AI has four units of pikes, three of muskets and two of artillery. As usual the AI's set-up is decided by dice.
Royalist muskets and cannons look well-protected by pikes
The human wins by forcing from the field, or demoralising, every Royalist unit before the end of turn 10, and I will write up the game turn by turn.
TURN ONE
My seven dice give me 6, 5, four 4s and 1 - not much use since 4-5-6 are attack orders, and on turn one I need move orders, ie 1-2-3.
I re-roll the 4s, getting 6, 5, 3 and 1, giving the move orders to the pikes and the furthest-back horse.
A slow start
The righthand Royalist artillery fire at the pikes I rather carelessly moved into their line of fire, requiring 9+ from the usual two dice to score a hit (increased from 8+ thanks to firing through trees), but throw 4.
The lefthand artillery move one hex to the right to put them on the same column of hexes as a Parliamentarian unit of horse.
Only one musket unit advances, but the three righthand pike units advance obliquely to the right, effectively preventing Parliamentarian cavalry from rushing along high ground to try to outflank them and get at the muskets and cannon.
Situation at the end of turn one