Monday, July 31, 2023

Battle Of Roliça: French Playthrough: Turn 10

Situation at the end of turn nine
My three dice give me 6, 2 and 1. I reroll them and get 4, 3 and 1.
My artillery bravely mount the ridge and occupy the objective hex.
The AI's four dice land three 6s and 2. The 6s are rerolled, giving two 5s and 3.
Incredibly this means I win as there is no way the allies can capture the objective hex this turn. The point is allied units in areas 2 and 5 cannot get within range and line-of-sight of my artillery, thanks to the high ground, and the units in area 4 cannot be activated.

Sunday, July 30, 2023

Battle Of Roliça - French Playthrough: Turn Nine

Situation at the end of turn eight
My three dice give me 6, 5 and 4. Since my commander is dead, I cannot count the 6 as a wildcard, so I reroll it and the 5, but get another 6 and 2.
My infantry climb the ridge and charge the French horse, their two dice being increased by one for meleeing after moving and another one for being on higher ground, but I roll 3 and three 1s.
The AI's four dice are 4, two 2s and 1. It rerolls one 2, but gets 6.
The forward infantry in area 1 have no target within their arc of fire, They roll 1, meaning they move nearer my artillery, and they do this by moving obliquely backwards so as to be in range and line of sight. Their two dice land 4 and 1, forcing my artillery off the ridge. The other infantry in area 1 roll 3, but stand still as they cannot move nearer the objective hex.
The allied artillery roll 6, and so move into the trees.
The cavalry attack my remaining infantry, their four dice being increased by one thanks to the nearby presence of Wellesley. The dice land 4, 3 two 2s and 1, forcing my men back a hex.
Wellesley moves two hexes towards the objective, which puts him on the ridge, from where he attacks my infantry. His four dice are increased by one thanks to being on higher ground, and he rolls two 6s, two 5s and 4, well and truly eliminating my unit.
The allied infantry in area 4 roll 1, meaning they advance into trees.
To win the game my artillery need to occupy the objective hex and somehow hold out for a turn against allied attacks

Saturday, July 29, 2023

Battle of Roliça - French Playthrough: Turn Eight

Situation at the end of turn seven
My three dice give 3, 2 and 1. I reroll the 1 and 3 (the artillery have no target), but get two more 3s.
My cavalry attack the infantry next to them, but the four dice land a very disappointing two 2s and two 1s.
I could move the artillery, but since guns cannot move and fire in the same turn, they might as well be left where they are.
The AI's four dice are 4, 3, 2 and 1.
The further-forward infantry in area 1 fire at my cavalry, getting two dice (there is no bonus die for infantry at range one unless they have moved that turn and are therefore charging into a melee). The dice land 4 and 3, forcing my unit back onto the ridge. The other infantry in area 1 roll 5, meaning they move forward a hex and fire at my artillery. Their two dice are reduced by one for firing after moving, and they roll 1.
The allied artillery fire at my cavalry, their two dice being reduced by one for firing through trees. But they roll 5, eliminating my unit.
The cavalry in area 4 attack my infantry on the ridge, rolling four dice, scoring 6, 5 and two 2s, reducing my unit to one-strength.
The infantry in area 4 fire at the same unit. Their four dice are increased by one thanks to being adjacent to Wellesley but reduced by one for firing through trees. They roll 6, 5, 4 and 2, eliminating my unit.
Wellesley advances two hexes towards the objective hex, but straight down rather than obliquely, and this puts him adjacent to the allied cavalry and an infantry unit.
The French position is collapsing rapidly

Friday, July 28, 2023

Battle Of Roliça - French Playthrough: Turn Seven

Situation at the end of turn six
My three dice are all 3s. I reroll two of them, but get a 5 and another 3.
I can only activate my artillery. They can fire at a one-strength infantry at short range (one-to-three hexes) or a three-strength infantry at long range (four-to-six hexes). I decide to go for the surer kill. My three dice are increased by one for being on higher ground, and I roll 6 and three 2s, eliminating the one-strength infantry.
The AI rolls 5, two 3s and 1. The 3 is rerolled as a 4.
The forward infantry in area 1 attack my cavalry. Their two dice (the unit is one-strength) are 3 and 2. The other infantry in area 1 fire at my cavalry. Their two dice are 6s, reducing my unit to one-strength.
The one-strength cavalry in area 4 attack my infantry on the ridge. Their four dice are three 3s and 1. The infantry in area 4 advance one square obliquely right, putting them behind trees as they cross the river. Wellesley advances to stay in touch with the infantry.
Both infantry units in area 5 advance a hex.
Crunch time is approaching on the French right flank, while the left also looks none-too-strong

Thursday, July 27, 2023

Battle Of Roliça - French Playthrough: Turn Six


Situation at the end of turn five
My three dice give 4 and two 1s. I desperately need to activate my units in areas 2 and 3, so I reroll all three dice, getting two 6s and 2. I turn the wildcard 6s into a 3 and 4, so I will be fully activated.
I start by using the cavalry to charge the right-flank allied infantry (note that, unlike the previous refight, the AI never orders its infantry into square formation in this battle - the AI behaves differently in each scenario). My six dice are 6, 5, two 3s and two 1s, reducing the infantry to one-strength.
The artillery fire at the cavalry in their line of sight. Their two dice are increased by one through being on higher ground, another one for being adjacent to General Delaborde and two more for firing at short range. The six dice are 6, 5, two 3s and two 2s, reducing the cavalry to one-strength.
The infantry on the objective hex cross the ridge and charge the other cavalry unit. Their three dice are increased by one for being on higher ground and another one for attacking at a range of one hex after moving, ie they are meleeing at bayonet-point. The five dice give 6, 5 and three 2s, reducing the cavalry to one-strength.
The infantry that retreated last turn advance a hex, and I take a risk by using Delaborde to cross the ridge and attack the further-back allied cavalry. A commander (and his escort) count as one-strength cavalry, so I get two dice (I presume the commander does not get an extra die for being "adjacent to its commander"). I roll 6 and 1, eliminating the enemy unit.
Delaborde's bravery has placed him in great danger
The AI's four dice are 5, 3 and two 2s. One 2 is rerolled, but gives another 3.
The allied artillery fire at my cavalry, although their two dice are reduced to one thanks to firing through trees, and that lands on a 3.
The one-strength infantry in area 3 fire at Delborde. Their two dice are 6 and 1, meaning Delaborde is killed. This does not end the battle, but is a big blow to the French cause as it means the commander can no longer boost units' attacking chances, and 6s rolled for area-selection are no longer wild.
The allied infantry in area 5 advance. Both get in range of my infantry on the ridge, but do not have line of sight as they are blocked by the area 4 cavalry.
The French continue to hold out but the arrival of the left-flank allied infantry could easily tip the balance

Wednesday, July 26, 2023

Battle Of Roliça - French Playthrough: Turn Five

Situation at the end of turn four
My three dice are 5 and two 3s. Since all my units are in area 3, there is no need to reroll.
I start by using the infantry on the objective hex to fire at the nearer allied cavalry. My three dice land 6, 4 and 1, thus eliminating the one-strength enemy unit.
My cavalry climb up onto the ridge and charge the other allied cavalry unit. My four dice give me 5, two 3s and 2, also eliminating the enemy unit.
Delaborde advances so he is in position to give encouragement to all the French units, except for the infantry on the low ground, who fire at the two-strength allied infantry. My four dice give me 6, two 2s and 1, reducing the enemy to one-strength.
My artillery fire obliquely to their left at a three-strength allied infantry unit. The three dice are increased by one through being on higher ground, another one through being next to the commander and two more for firing at short range. My seven dice give me two 5s, 4, two 3s and two 1s, reducing the enemy to one-strength and forcing them back a hex.
It has been a decent half-turn for the French cause, but the Anglo-Portuguese are bound to keep on coming 
The AI's four dice are two 6s and two 3s. All but one 3 are rerolled, giving 5 and two 4s, meaning the left-flank allied column will at last be completely activated this turn.
The infantry in area 3 fire at my nearer infantry, their two dice giving them 4 and 1, forcing my men back onto the ridge.
The further-forward cavalry roll 4, meaning they advance directly two hexes and attack the infantry that have just fallen back. Their six dice give them 5, two 3s and three 1s. reducing my unit to two-strength. The other allied cavalry roll 5, meaning they also advance two hexes and attack the same infantry unit. Their six dice are two 4s, 3 and three 1s, causing my unit to retreat to the edge of the battlefield.
The infantry in area 4 advance a hex, as does Wellesley, putting him next to, at least temporarily, two friendly units.
Both infantry units in area 5 advance.
The allied right-flank column is depleted but still dangerous, while the cavalry of the left-flank column have just started to make their presence felt

Tuesday, July 25, 2023

Battle Of Roliça - French Playthrough: Turn Four

Situation at the end of turn three
My three dice are two 5s and 2. I reroll the 5s and get 4 and 1.
My one-strength cavalry attack the allied cavalry on the ridge, getting two dice. They are both 5s, meaning the enemy is reduced to one-strength.
My infantry in area 4 advance obliquely left and fire at the infantry ahead of them (the cavalry by the trees are not within the unit's arc of fire). Their four dice are reduced to three thanks to firing after moving, and I roll 6, 2 and 1, reducing the enemy unit to two-strength.
The objective hex is well-protected by French units, but for how long?
The AI's four dice are two 5s, 3 and 2. One 5 is rerolled and becomes 1. This means the AI will activate every unit except the two in area 4.
The infantry in area 1 roll 5 and 6, meaning they both advance a hex. The further-forward unit wants to shoot at Delaborde, but intervening high ground blocks their line of sight (my artillery are not within their firing arc).
The cavalry on the ridge attack my one-strength cavalry, their two dice being increased by one thanks to being on higher ground. They roll 5, 4 and 2, eliminating my unit. The other allied cavalry roll 4, meaning they advance downwards one hex and then obliquely right onto the ridge, attacking Delaborde. Their two dice are 4 and 3, forcing my commander back a hex. The artillery roll 3 but cannot move obliquely down as that would not put them in range of an enemy unit.
The two-strength infantry in area 3 fire at my infantry on the low ground, rolling 3 and two 1s.
Both cavalry units in area 5 roll 3, meaning they move two hexes obliquely forward. The infantry roll 6 and 2, both advancing a hex.
Wellesley has at last got his lefthand column moving

Monday, July 24, 2023

Battle Of Roliça - French Playthrough: Turn Three

Situation at the end of turn two
My three dice are two 5s and 4. I reroll the 5s, but get two more 5s.
I can only activate my units in area 4, so I advance the infantry onto the ridge and send the cavalry two hexes obliquely back to their left.
The AI's four dice are 6, 3, 2 and 1. The 6 is rerolled, but becomes 3.
The three-strength cavalry in area 1 roll 2. They want to head for the objective, and so climb onto the ridge, where they attack my left-flank infantry. Their six dice are two 6s, 5, 4, 2 and 1, eliminating my unit. Both infantry units in area 1 advance a hex.
The one-strength cavalry roll 1, and so do not move. The artillery roll 6 and so advance a hex.
The infantry in area 3 fire at my artillery, getting three dice. They roll 4, 3 and 1, but my artillery do not fall back a hex as being adjacent to the commander nullifies that.
The ridge has proved to be anything but a fortress

Sunday, July 23, 2023

Battle Of Roliça - French Playthrough: Turn Two

Situation at the end of turn one*
My three dice are 3 and two 2s. I reroll one of the 2s, but get a 3.
I start by advancing the units in area 3 onto the ridge. The artillery are now in line-of-sight and range of one of the allied cavalry units, but artillery cannot move and fire.
My infantry in area 2 climb onto the ridge and fire at the further-forward allied cavalry. Full-strength infantry firing at cavalry get three dice, increased by one here thanks to being on higher ground, but decreased by one through firing after moving. I roll two 6s and a four, meaning the cavalry are reduced to one-strength and fall back a hex.
My cavalry in area 2 advance onto the ridge, and Delaborde advances two hexes so he is supporting, ie is adjacent to, the artillery and two infantry units.
The French are heavily outnumbered, but occupy a strong position that may need coordinated action to successfully assault*
The AI's four dice are 6, two 3s and 1. The 6 and a 3 are rerolled, giving 2 and another 6, so again the allies' right-flank column will activate but the left will stand still.
The three-strength cavalry in area 1 roll 5, meaning they move two hexes straight down and attack my left-flank cavalry. Full-strength cavalry attacking cavalry get four dice. They roll 6, 5, 4 and 1, meaning my cavalry are reduced to one-strength and fall back a hex.
The other cavalry in area one advance obliquely two hexes towards the objective, and both infantry units advance.
The artillery roll 2, which means they stand still as they cannot advance and put an enemy unit in range, and the infantry in area 3 advance.
I am fortunate the allies are attacking piecemeal (or not at all in the case of the left-flank column)
*Some infantry counters are the wrong way up, showing the units as being at only two-strength - I corrected this before making the AI's turn.

Saturday, July 22, 2023

Battle Of Roliça - French Playthrough: Setup & Turn One

ALL the battles in Mike Lambo's Napoleonic book are designed to be fought twice - once from the allied side and once from the French.
I will be General Delaborde, with three units of infantry, two of cavalry and one of artillery
To win I have to prevent the Anglo-Portuguese forces under Sir Arthur Wellesley from occupying the darker-shaded hill-hex at any point before the end of turn 10.
I have to setup my troops below the blue dotted line*
My dispositions take into account that it seems to me the best place for the French artillery is on the further-forward hex in area three, from where their line of sight to approaching units on the lines of hexes they can shoot along will not be affected by trees or high ground.
The AI, in addition to Wellesley, gets six units of infantry, four of cavalry and one of artillery. Their initial positioning is partly fixed and partly determined by rolling dice.
This led to multiple dice-rolling for the infantry as the results kept meaning units were due to be placed on hexes already occupied, but eventually all was resolved.
The AI has split its forces into two columns*
As usual I will write up the refight as it goes along.
TURN ONE
My three dice are 5 and two 4s. I keep one 4 but reroll the other dice, getting 3 and another 4, meaning I will only be able to activate the four furthest-right units of my army.
I duly advance them, with the horse occupying high ground rather than advancing further.
The AI rolls 6, 3, 2 and 1. The 6 is rerolled, but again comes up 6. The result is the AI will be able to activate all of its right-flank column, but none of the left.
The cavalry units roll 4 and 6, meaning they both move straight down two hexes. Both infantry units in area 1 also advance, as do the infantry in area 2.
The artillery roll 2, meaning they move obliquely downwards if that puts them in range and line of sight of an enemy unit, but that does not apply, so they remain where they are.
The allied right is advancing without much discipline*
*I have carelessly, not for the first time, failed to put all the infantry counters the right way up so they are shown as being three-strength - this will be corrected for turn two.

Friday, July 21, 2023

Summing Up My Allied Playthrough Of Roliça

I LOST, but I had a blast.
It was particularly interesting how the AI copied the real General Delaborde's tactics of defending the high ground.
There is no doubt the rules are a huge step forward over those in Mike Lambo's English Civil War book.
I very much enjoyed fighting battles from that book, but Battles Of Napoleonic Europe is on a whole new level.
There is no way the ECW battles could be thought of as simulations - the Napoleonic ones certainly could.
The one cloud on the horizon is that so far I have refought the first scenario in the Napoleonic book, and if later refights become more difficult, as they do in the ECW book, my quantity of fun will quickly diminish.
Only the future will determine that; for the moment I am very satisfied.

Thursday, July 20, 2023

Battle of Roliça - Allied Playthrough: Turn 10

Situation at the end of turn nine
My three dice give me 4, 3 and 2. I reroll the 3 and 2, hoping for a 5, but get 2 and 1.
My three-strength cavalry charge the French infantry in the objective hex. Their six dice are reduced by three because the French are in square, and I roll 6, 2 and 1. That reduces the French by a strength point, but I have to concede the battle as I cannot occupy the objective hex this turn.

Wednesday, July 19, 2023

Battle of Roliça - Allied Playthrough: Turn Nine

Situation at the start of turn nine
My three dice are 5, 4 and 1. I reroll the 1, but get another 5.
The cavalry in area 5 rush onto the hill, and Wellesley moves towards the hill. The infantry cannot fire at the French cavalry because the target is not within their arc-of-fire.
My other cavalry also rush onto the hill, from where they attack the infantry in the objective hex. Full-strength cavalry attacking infantry get six dice, increased by one here for being on higher ground, but reduced by three because the French are in square formation. My dice give me 4, 3, 2 and 1, which has no effect because infantry in square formation never retreat. The three-strength infantry in area 4 enter the trees and charge the French cavalry. Their three dice are increased by one thanks to attacking at a range of one hex after moving. The four dice are two 4s and two 1s, meaning the horse retreat onto the hill and then lose a strength point as they cannot make a second retreat move.
Will the squares, specifically the one in the objective hex, hold?
Before playing the AI's turn, I want to mention two modifications I intend implementing for infantry in square formation.
Under the rules such infantry suffer a -1 modifier when firing at a range of two or three hexes. This seems inadequate to me, and I am increasing it to -2.
But, as far as I can see, infantry in square are restricted to the same arc-of-fire as infantry in normal formation, which seems wrong as they should be able to fire all-round, which is what I am changing the rule to, not that I expect either rule change to apply in this game.
Anyway, the AI's four dice are 3, 2 and two 1s. One 1 is rerolled, giving a 4.
The one-strength infantry on the hill fire at my infantry in trees, getting two dice, increased by one for being on higher ground and another one for being next to the commander, but reduced by one for the target being in cover. The dice come up 5, 3 and 2, taking a strength point off my men. General Delaborde remains where he is.
The French cavalry attack my left-flank cavalry, getting two dice (the French unit is at one-strength). Two 2s are rolled. The full-strength infantry on the hill remain in square formation, while the infantry in the objective hex attack my left-flank cavalry. Their three dice are two 6s and a 2, reducing my men to a one-strength.
It is going to take some impressive dice-throwing to pull off an allied victory

Tuesday, July 18, 2023

Battle of Roliça - Allied Playthrough: Turn Eight

Situation at the end of turn seven
My three dice are two 4s and 3. I reroll the 3 and one 4, getting another 3 and another 4.
The one-strength infantry could form square to protect themselves from the French cavalry, but that would reduce their offensive capability, so instead I order them to fire at the cavalry. They get two dice, and I roll 6 and 1, reducing the cavalry to two-strength.
My area 4 infantry move into trees. They cannot fire at the cavalry, who are not in their line of sight, and so fire at the one-strength French infantry. Their three dice are reduced by one for firing after moving, and I roll 3 and 2. The area 4 cavalry advance through the gap between my two advanced infantry units.
My flank attack has not made fast-enough progress, it would seem
The AI's four dice are two 6s, 5 and 3. The 6s are rerolled, giving another 6 and a 2.
The French cavalry roll 5, and so attack my infantry in the trees. Two-strength cavalry attacking infantry get five dice (a good reason for putting infantry in a square formation), minus one in this case because the infantry are in cover. The four dice are two 6s, 4 and 3, meaning my unit is reduced to a strength of one and retreats a hex. The one-strength French infantry roll 1, meaning they stay where they are. General Delaborde also stands pat.
Both French infantry units in area 3 have enemy cavalry within three hexes, and so form square, which I have shown by adding green beads. Neither can fire as they have high ground between them and the only enemy unit within range, my rearward horse. It is obvious the infantry in the objective hex do not have line-of-sight, but the other unit also cannot sight the cavalry because of the 'plateau effect'.
The French infantry brace themselves for cavalry attacks over the next two turns (I have already moved on the turn counter)

Monday, July 17, 2023

Battle of Roliça - Allied Playthrough: Turn Seven

Situation at the end of turn six
My three dice are 4, 3 and 1. I keep the 4 but reroll the others, getting another 4 and another 3.
I start by advancing the three-strength infantry in area 4 into the trees so they can fire at the two-strength French on the hill. My four dice are reduced by one for firing after moving. I roll 6 and two 2s, reducing the French to a one-strength unit. My two-strength infantry advance obliquely to their left and fire at the three-strength French on the hill. Two-strength infantry firing at infantry get three dice, reduced by one here for firing after moving, and I disappointingly roll 3 and 1.
The left-flank horse advance two hexes to behind the infantry units who have just moved and fired.
Time may turn out to be the allies' biggest obstacle
The AI rolls two 5s, 3 and 1. One 5 is rerolled, giving a 2, meaning every French unit will be activated.
Artillery can only fire along a direct line of hexes, so, having no target, they roll a die, but 1 means no movement. The cavalry roll 6, moving two hexes obliquely towards my two-strength infantry.
The one-strength infantry fire at my infantry in the trees (tiebreaks favoured this target over the two-strength infantry in the open). One-strength firing at infantry roll two dice, increased by one through being on higher ground and another one for being adjacent to General Delaborde, but reduced by one thanks to the trees. The dice land 4, 3 and 1, forcing my infantry obliquely backwards a hex (direct retreat was blocked by cavalry). Delaborde has no move.
The three-strength infantry on the hill fire at my two-strength infantry. Their four dice are increased by one thanks to being on higher ground and one more for being next to the commander. The result is 6, 4 and four 3s, reducing my unit to one strength and sending it back a hex. The infantry in the objective hex roll 2, and so stand still.
The French are outnumbered but only have to hold out three more turns

Sunday, July 16, 2023

Battle of Roliça - Allied Playthrough: Turn Six

Situation at the end of turn five
My three dice are two 5s and 1. I reroll the 1 and a 5, getting 3 and 2.
I start by advancing my right-flank cavalry two hexes forward, and do the same for Wellesley. Then I advance the right-flank infantry and fire at the French one-strength infantry. My four dice are increased by one thanks to being next to Wellesley, but reduced by one because they are firing after moving. I roll two 5s, 2 and 1, eliminating the French unit.
In area 2 I advance the cavalry obliquely forward two hexes to their right. The artillery fire at the two-strength French infantry on the hill. The three dice are all 5s, eliminating the enemy unit. The infantry advance and fire at the French infantry on the hill in front of them. However their four dice are reduced by two thanks to firing from a river hex and through trees. I roll 5 and 3, reducing the French to a two-strength unit.
My flank attack looks promising
The French roll 4, 3 and two 2s. One 2 is rerolled, but becomes a 3.
The infantry in area 2 fire at my infantry in the river hex. Since the French are a two-strength unit, they get three dice, increased by one through being on higher ground and another one thanks to being next to General Delaborde, but reduced by one for firing through trees. The dice result in 4, 3 and two 1s, forcing my unit to retreat a hex. Delaborde remains in position, while the area-3 infantry on the hill roll 3, meaning they also stand still. The infantry in the objective hex roll 1, and so also do not move.
The battle is still in the balance

Saturday, July 15, 2023

Battle of Roliça - Allied Playthrough: Turn Five

Situation at the end of turn four
My three dice are 4, 3 and 1. I reroll the 3 and 1, getting another 4 and another 1.
All I can do is activate my units in area 4, and I start by advancing the three-strength infantry, who then fire at the nearest French on the hill. My four dice are reduced by one for firing through trees and another one for firing after moving. I roll two 5s, reducing the French to a one-strength unit. Then I advance my two-strength infantry and fire at the same French unit. Two-strength infantry firing at infantry get three dice, reduced by one thanks to firing through trees and one more for firing after moving, and I roll a 1.
I need to get my left-flank moving
The AI's four dice are 6, 4 and two 1s. The rerolled 6 and duplicate 1 give two 2s, so French units in areas 1 and 2 will be activated.
The French cavalry roll 2, meaning they do not move. The artillery roll 6, meaning they move forward a hex.
The infantry on high ground in area 2 roll a 2, remaining where they are as the objective hex, to which they would otherwise move, is not vacant. General Delaborde also remains where he is as he cannot move adjacent to more friendly units than he is already beside. The two-strength infantry roll 3, advancing onto the hill.
Halfway through the 10 turns, and I find it hard to judge which side has the advantage

Friday, July 14, 2023

Battle of Roliça - Allied Playthrough: Turn Four

Situation at the end of turn three
My three dice are 5, 4 and 1. I reroll the 1, getting a 3, meaning I will be able to activate all my right-flank units.
First I advance the area-5 cavalry straight forward a hex and then obliquely forward to their right, keeping out of range of the French infantry.
Then I move my three right-flank infantry units obliquely forward to their right, and Wellesley in the same direction, but by two hexes (technically I should have moved all the area-4 units before moving the area-3 infantry, but in this case it did not make a difference).
The outflanking manoeuvre continues
The AI's dice are two 6s, 5 and 4. The 6s are rerolled, giving 5 and 3, meaning the AI can only activate the three infantry units in area 3.
The furthest-forward infantry roll 1, meaning they stand still as the objective hex is not vacant (and anyway they could not move nearer to it). The other area-3 infantry on high ground also roll 1, with the same result, and this happens again for the infantry in the objective hex.
That ends the AI's turn, which has not resulted in any changes to the battlefield.

Thursday, July 13, 2023

Battle of Roliça - Allied Playthrough: Turn Three

Situation at the end of turn two, with the thin red line advancing against the massed bluecoats
I roll two 5s and 1. I reroll one 5 and the 1, getting 3 and another 1, meaning I can activate only my cavalry, my commander and the infantry in area 3.
I advance my right-flank cavalry two hexes and move my left-flank cavalry two hexes to their right (I hope to get around the French left flank).
Then I move the area-3 infantry behind trees, and move Wellesley two hexes to his right, keeping him out of range of the French.
My outflanking manoeuvre is underway
The French roll 5, two 3s and 2. One 3 is rerolled, but the result is another 3. 
The infantry on high ground in area 2 roll a 4, meaning they remain on the hill. General Delaborde wants to move so as to be adjacent to more friendly units, but that is not possible, so he remains where he is. The rearward infantry in area 2 roll a 1, meaning they should move nearer the objective if it is vacant, but it is not, so they also do not move.
The furthest-forward infantry in area 3 fire at my infantry behind the trees. Their four dice are increased by one thanks to being on higher ground, but reduced by one because they are shooting through trees. They roll 5, two 4s and 2. My unit is reduced to a strength of two and falls back two hexes. The other infantry on high ground in area 3 roll a 3, meaning they stay on the hill. The infantry in the objective hex roll a 5 but cannot, as instructed, move straight down.
There are no French units in area 5, so the AI's turn ends.
The French position looks solid, but Delaborde will surely want to get his artillery into action asap

Wednesday, July 12, 2023

Battle of Roliça - Allied Playthrough: Turn Two

Situation at the start of turn two (with all counters the right way up)
My three dice give me 6, 3 and 1. I am happy with the 3, but reroll the 1, getting a 2, and I change the 'wildcard' 6 to a 4, meaning I can activate units in the three central sectors, which is all of my army bar the cavalry.
I start by firing my artillery, which has a range of six hexes, at the French infantry on the high ground in front of them. Full-strength artillery firing at infantry get three dice, and in this case there are no modifiers to increase or decrease the number. Each 5 or 6 rolled means a hit, reducing the target's strength by one, and each 4 usually means the target retreats by a hex, although there are exceptions where this does not apply including, as is the case here, when a unit is adjacent to the commander. I roll 6, 4 and 1, meaning the French infantry unit is reduced to two-strength (hits are always acted on first) and then retreats a hex.
Next my infantry in area 2 fire at the cavalry sheltering in trees. Full-strength infantry firing at cavalry roll three dice. Here that is increased by one for the firers being next to the commander, but reduced by one because the cavalry are in cover. I roll 6, 3 and 2, meaning the cavalry are reduced to two-strength.
The leading infantry unit in area 4 also fire at the cavalry in trees. Their three dice are reduced by one thanks to the cover, and my roll of 3 and 2 is no good.
The right-flank infantry in area 3 advance a hex and fire at the same cavalry. Their three dice are reduced by one thanks to the cover and a further one thanks to firing after moving. I roll 5, reducing the cavalry to one-strength.
My other infantry in area 3 advance a hex and attack the cavalry. Their three dice are reduced by one thanks to the cover but increased by one for attacking at a range of one hex after moving (this is regarded as meleeing).  I roll two 6s and 2, eliminating the French unit.
Finally I advance my commander one hex and similarly advance my previously unactivated infantry in area 4.
First-blood has gone to the allies, who are streaming across the river
The AI's four dice are 6, 3 and two 1s. The 6 and one 1 are rerolled, giving 4 and 1, meaning the AI will activate all its units except those in area 2.
The AI's units are always activated numerically by area, with the furthest-forward unit in an area taking precedence over units further back.
That means the French right-flank cavalry are first. They cannot attack anyone, so a die is rolled. It shows 5, which means no effect as 5-6 only have an effect after turn two.
The artillery have no one to attack, and a die roll comes up 3. That means they should move obliquely downwards, but that is impossible as cavalry occupy that hex.
Moving on to area 3, the further-forward infantry fire at the further-forward allied infantry in range. Full-strength infantry firing at infantry get four dice, but one is added as the French are on higher ground. The result is 6, 5, 3 and two 1s, reducing the allied unit to a strength of one.
The other infantry in area 3 roll a 3, meaning they move onto higher ground, and they do this obliquely to their right as they puts them within range and line-of-sight of my battered infantry unit, which they immediately attack. Their four dice are increased by one through being on higher ground and another one for being next to the French commander, but reduced by one for firing after moving. The five dice give 6, two 3s and two 2s, which is just enough to eliminate my one-strength unit.
The infantry in area 4 roll a 1, meaning: "If Objective is vacant Move nearer to it." Technically the unit cannot move any nearer as it is already adjacent to the objective hex, but I have taken the intent of the instruction to be that the objective hex should be occupied.
The French are occupying the high ground, while keeping in a compact mass

Tuesday, July 11, 2023

Battle Of Roliça - Allied Playthrough: Setup & Turn One

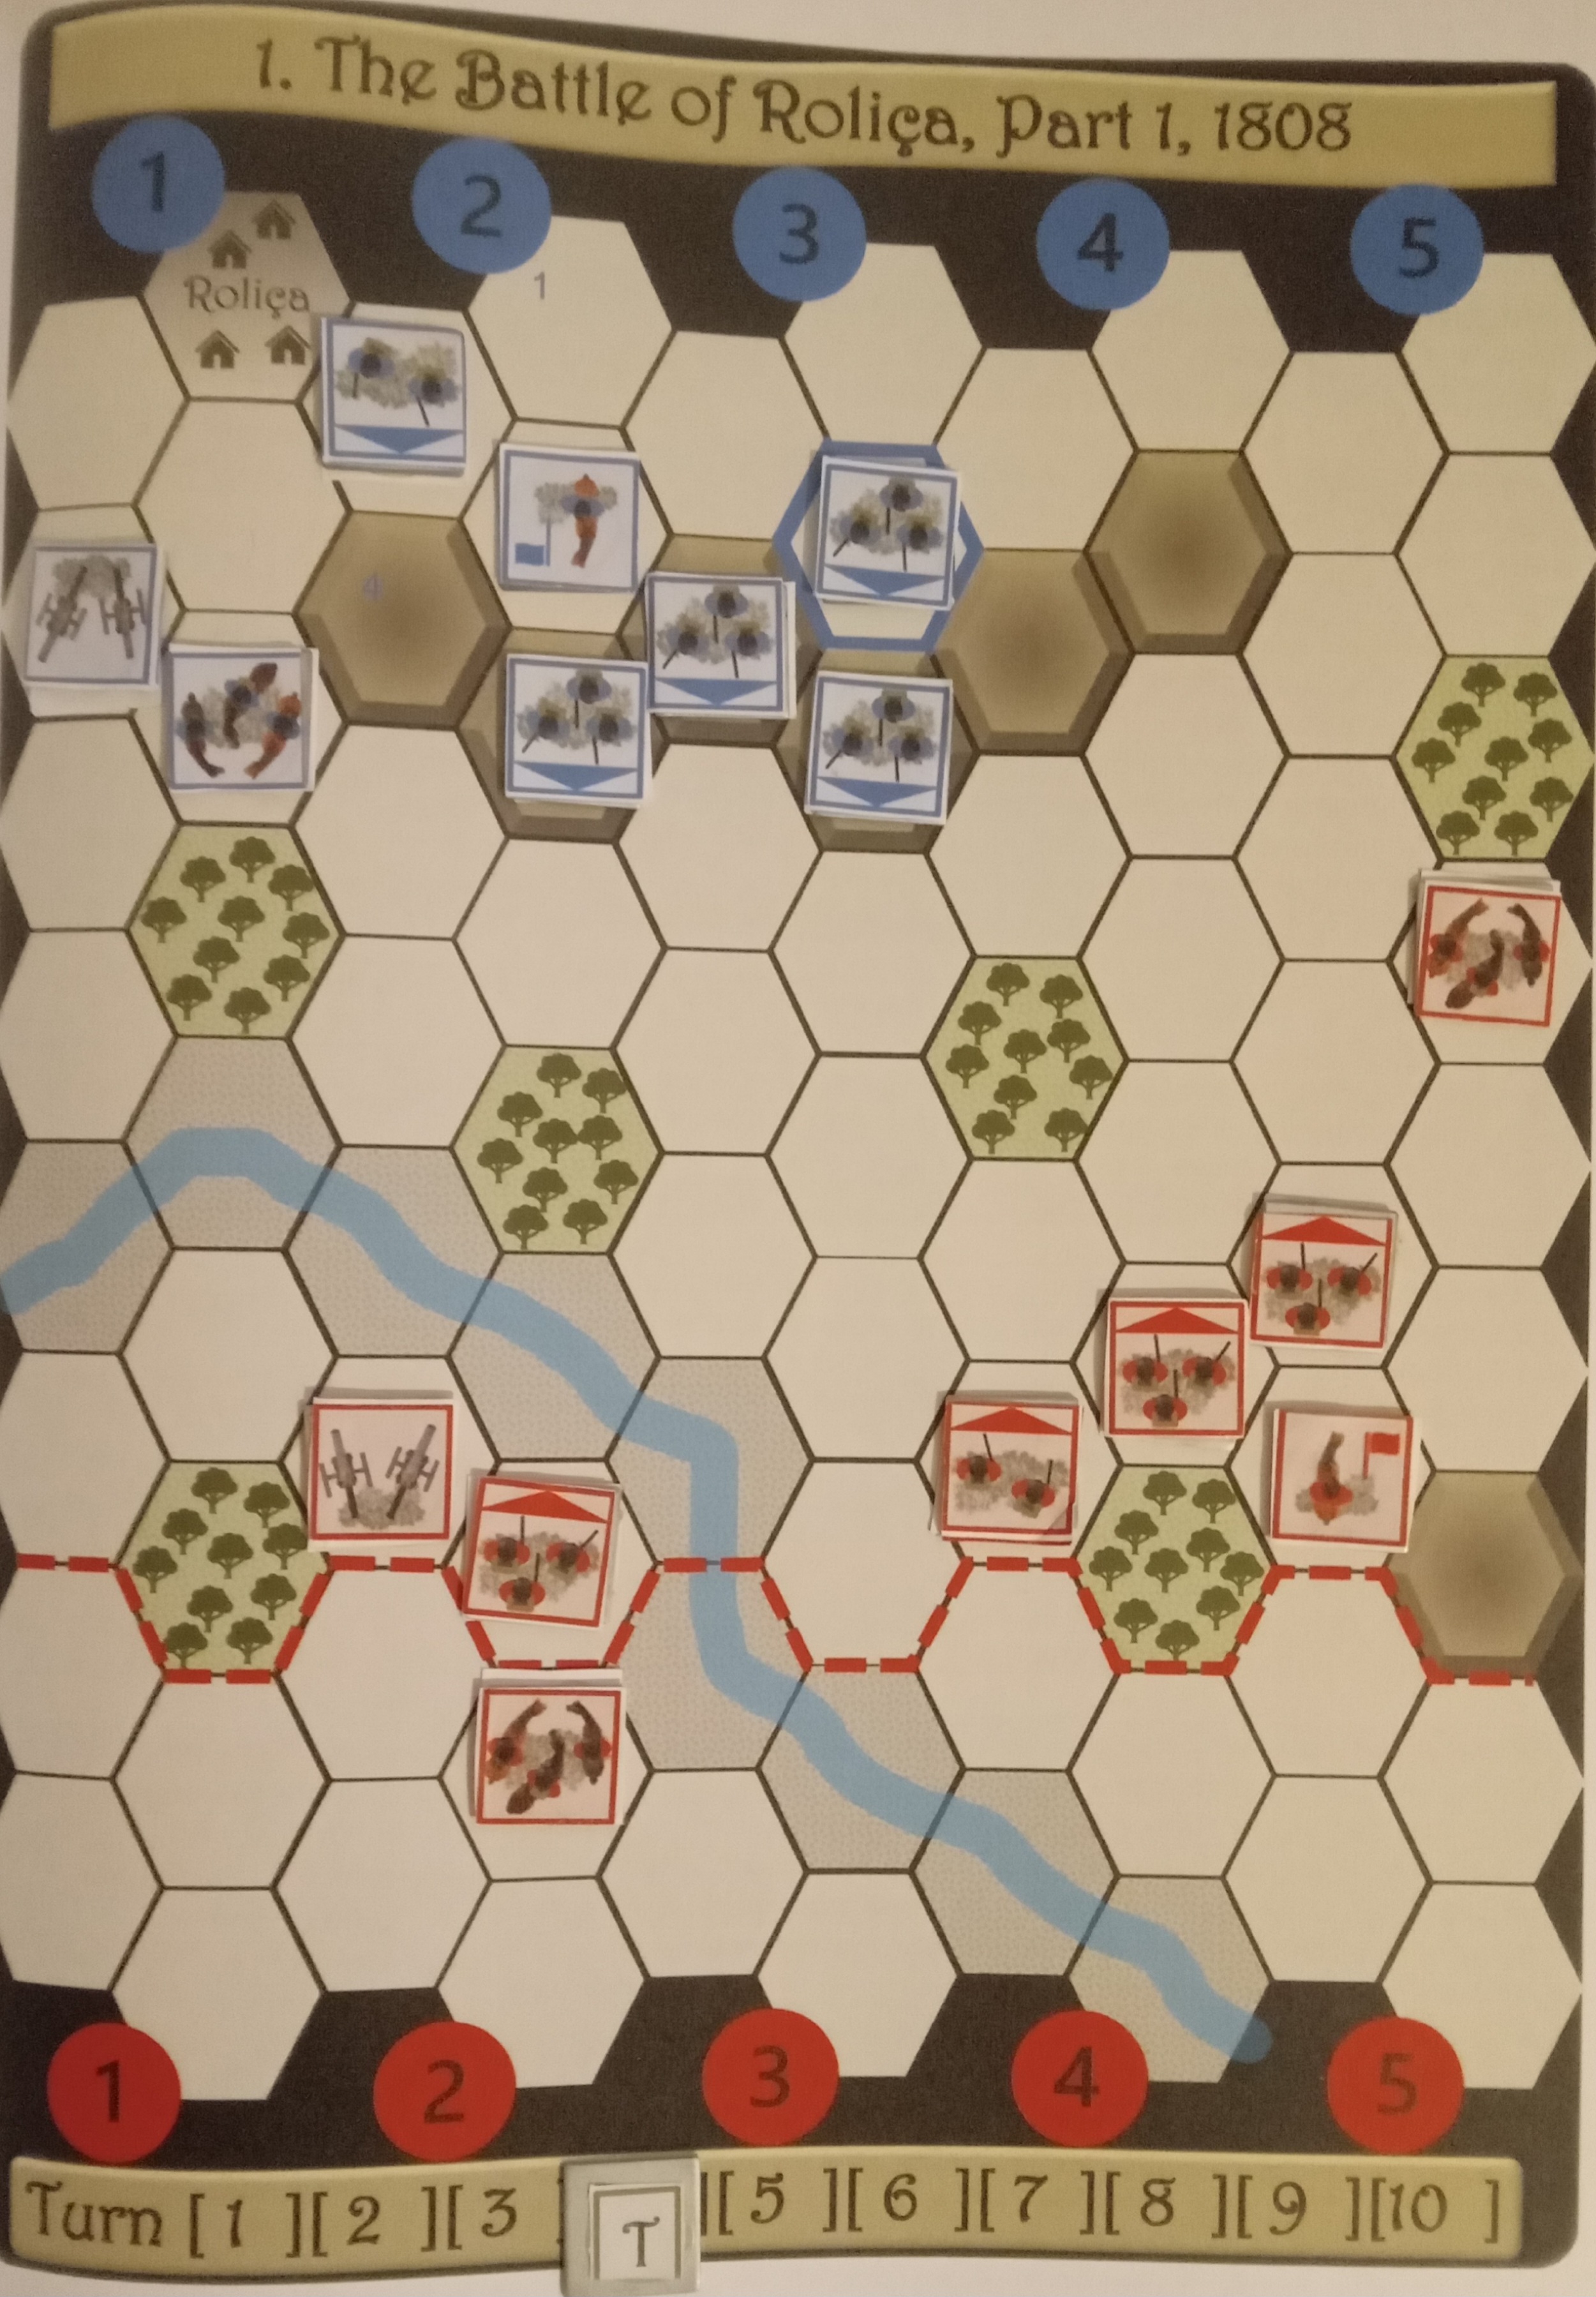
IN this scenario from Mike Lambo's Battles Of Napoleonic Europe, I will command the Anglo-Portuguese army, which, along with its commander Sir Arthur Wellesley, consists of five units of infantry, two of cavalry and one of artillery.
The allies will attack from the bottom of the map
To win I have to occupy the hex outlined in blue near the top of the map before the end of turn 10.
I have to set up first, and my troops must start below the red dotted line.
Unlike in the ECW book, where artillery had unlimited range but had to remain on the rear row of hexes, artillery here has a range of six hexes, but can move about the battlefield.
Artillery can only fire directly along a line of hexes, whereas infantry can shoot anywhere to their front, so I suspect siting artillery can be a crucial decision, but since this is my first game I am basically making it up as I go along, or at least experimenting with a clean slate.
In the end I have gone for a generally classical setup with infantry in the centre, flanked by cavalry, but with artillery rather unusually sited on the left flank, where for the most part trees should not interfere with aiming at the enemy.
I have put my units as far forward as I reasonably can, with Wellesley in close attendance*
In the real battle the French were heavily outnumbered, but, Lambo explains in the book that "the armies have been levelled up here to provide more of a challenge."
I am far from sure I like this approach. I would prefer the refight to be more faithful to the real battle, making sure the terrain features that hampered the allied attack in 1808 were given due prominence.
Be that as it may, in Lambo's scenario, the French, as well as their commander General Delaborde, also have five units of infantry, two of cavalry and one of artillery. If it made the first scenario rather easy for the human player, then sobeit.
The AI's infantry are placed in a compact line behind the high ground, while the siting of the other French units, including Delaborde, is decided by rolling dice.
The AI has placed its artillery on the French right-flank, screened by cavalry*
As usual I will write up the battle as it progresses.
TURN ONE
My first task is to roll three dice, which will show me in which areas I can activate units.
As can be seen, the battlefield is 10-hexes wide, and is divided vertically into five areas of two files each.
I roll 2 and two 1s, and can reroll any number of them once.
I decide to keep the 2 as it is reasonably useful since it means I can activate my artillery and left-flank infantry, both of which are on files in area 2.
Naturally I would want to reroll one of the duplicate 1s, but I decide to reroll both, getting 4 and 3.
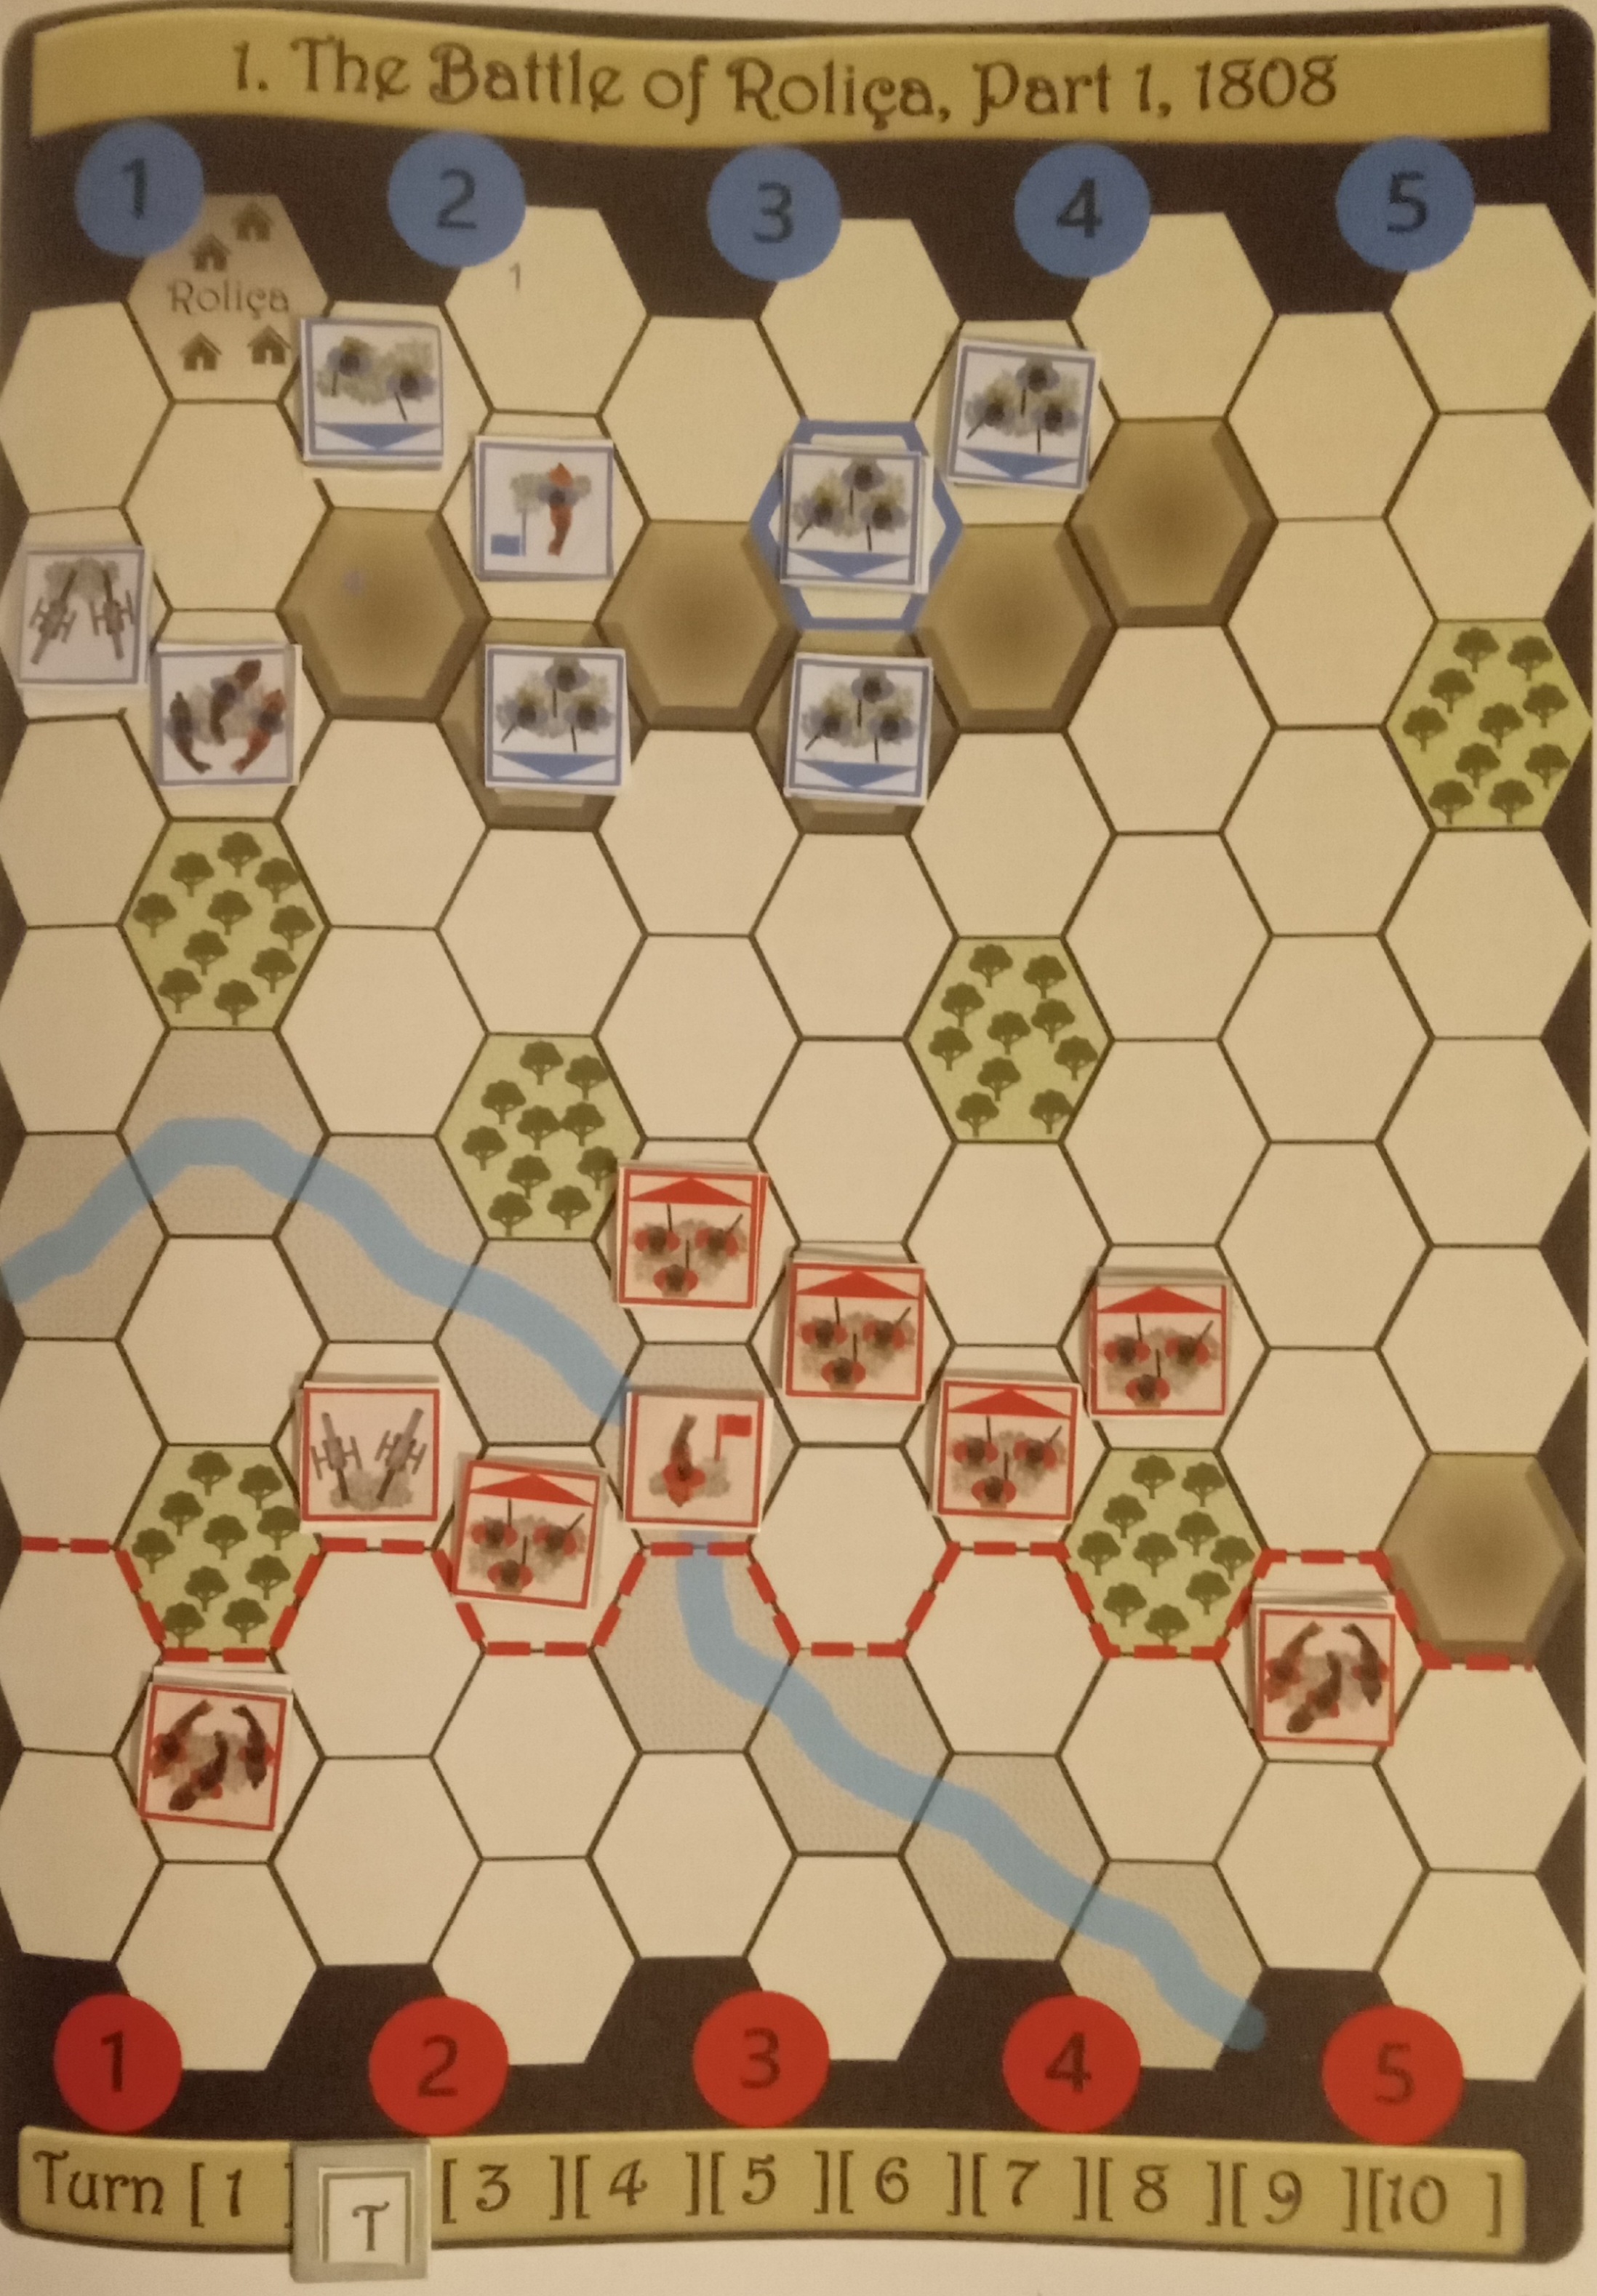
Thanks to the rerolls, I can order a general advance in the centre
I am able to activate every unit except my cavalry, and I do advance all such units one hex.
I can almost hear drums beating and see flags billowing as the allied infantry advance
The AI gets four dice, and they give 6 and three 2s. The AI gets to reroll the 6 (this would not be allowed if Delaborde had already been killed in action) and any duplicates, in this case two 2s. The rerolls come up 6 and two 3s.
The AI has had to discard the rerolled 6 and one of the threes, meaning Delaborde can only activate units in areas two and three - however six of his nine units are in those two areas
The cavalry in area 2 are first to be activated (lowest-numbered areas are selected first for the AI's turn, and within each area the units furthest down go first). Since it cannot attack any enemy, a die is rolled, landing on a 4, meaning it wants to advance towards the nearest enemy infantry. Two of my infantry units are within four hexes, so the cavalry want to move nearer the unit further up. The AI's rules show they must do this with a vertical move (rather than a horizontal one), and the cavalry move two hexes directly down the map, finishing in trees beside the river.
The further-down infantry in area 2 roll 6, meaning they move straight down, occupying high ground in the process.
The other infantry in area 2 roll 4, meaning they occupy high ground - the only high-ground hex available to them being on the extreme right (from the French view) of the ridge.
Delaborde advances directly one hex down the map as this makes him adjacent to three friendly units (as will almost be seen later, units benefit from having the commander next to them).
The infantry in area 3 occupying the objective hex move forward on to high ground, and the infantry behind them advance obliquely to occupy the objective hex.
The French infantry are occupying the ridge, but the advanced French cavalry, despite taking shelter in trees, look vulnerable
*I inadvertently placed the British infantry and one of the French infantry units so they were showing a strength of two instead of three - I turned them over to show their real strength of three at the start of turn two.