Showing posts with label Edgehill. Show all posts

Monday, February 13, 2023

Summing Up The Battle Of Edgehill

MIKE Lambo reckons the battles in his solo wargaming books are, when possible, designed to increase with difficulty the further one gets into the book.
Certainly the Battle of Edgehill proved fairly easy, much helped, no doubt, by my knocking out the Royalist artillery with my first action (first, that is, apart from setting up the forces).
Embarrassingly, on re-reading the posts, I see I forgot to let the AI have its go on turn six.
However, I think it is fair to say that omission did not materially affect the outcome - I would surely have won anyway. 
Naturally, winning is nearly always fun, but leaving that factor aside I found the battle thoroughly enjoyable. It certainly did not feel, as I had feared, horribly unhistoric.

Sunday, February 12, 2023

Battle Of Edgehill Play-Through: Turn Eight

Situation at the start of turn eight
My six dice come up with a 3, four 2s and a 1. I re-roll the 2s, getting two 6s, a 4 and a 1.
The only unit not to get a useful die is the left-flank pikes.
Dice allocated
I move in for the kill, arranging matters so that when my right-flank pikes charge the Royalist pikes, the normal 8+ required is reduced to 4+ thanks to support from two units of muskets, one of cavalry and the cannon unit.
I roll a 6, meaning the Royalist pikes are demoralised, which finishes the game as I have successfully removed or demoralised all enemy units before time runs out, ie before the end of turn 10.

Saturday, February 11, 2023

Battle Of Edgehill Play-Through: Turn Seven

Situation at the start of turn seven
My six dice - I lost a unit last turn - give me a 5, two 3s and three 2s. I re-roll the 2s, getting a 6, a 3 and another 2.
For once dice allocation needed no thought
I make my move orders first so that when the cannon unit fires at the good-morale Royalist muskets, it requires only a 5+ as it has support from two units of muskets and the cavalry.
My roll of 7 demoralises the Royalist muskets, who have to retreat two hexes, which takes them off the battlefield as the second hex they should retreat into is already occupied.
My righthand musket unit fires at the Royalist pikes, requiring 7+ thanks to support from the other muskets. However I only roll a 2.
The end is surely nigh
The AI fails to rally its musket unit, but the pike unit charges my righthand muskets, coming up one short of the 6+ required for a hit.
One more turn should do it

Friday, February 10, 2023

Battle Of Edgehill Play-Through: Turn Six

Situation at the start of turn six
My seven dice give me two 5s, two 4s, a 3 and two 2s - but no 6 to rally the fleeing cavalry.
I re-roll the two 2s, but get a 3 and a 2, meaning the cavalry will flee the battlefield whatever I do.
Dice allocated
My right-flank cavalry duly leave the battlefield.
I move the cannon unit to the right to be on the same hex as two units of Royalist muskets, and I advance the right-flank pikes.
The left-flank pikes attack the Royalist pikes opposite them, supported by two units of muskets and one of cavalry, meaning only 5+ is needed. I roll a 10, demoralising the enemy pikes and forcing them to flee the battlefield.
The righthand muskets fire at the remaining Royalist pikes, requiring 8+, but I only roll a 4.
The other muskets have no target, and the remaining cavalry advance one square, staying out of range of the slowly advancing Royalist muskets.
I have four turns left to mop up Royalist resistance

Thursday, February 09, 2023

Battle Of Edgehill Play-Through: Turn Five

Situation at the start of turn five
The battle is going well for the Parliamentarians, but I need at least one 6 to perform a rally. I roll one 6, two 5s, two 4s a 3 and a 1.
The 6 I allocate to the fleeing pikes, and the 5s to the cannon unit and the forward muskets. I re-roll the 4s, getting a 6 and a 1.
This leaves me with a 6, a 3 and two 1s to allocate. I could use the 6 to rally the demoralised cavalry, but they would be in grave danger from Royalists pikes and muskets, so instead I give them a 1, meaning they will have to flee.
The other 1 and 3 I give to the backward musket and cavalry units, and discard the 6 (technically allocating it to the left-flank pikes in the wood). 
Dice allocated
I accordingly rally the demoralised pikes and allow the demoralised cavalry to flee, leaving them two hexes, ie one turn, from exiting the battlefield.
The cannon unit fires at the enemy muskets on higher ground in its line-of-fire, getting exactly the 8 required for a hit.
The left-flank cavalry gingerly move forward one hex to keep out of the way of the nearby Royalist pikes, and the backward muskets also advance,
That leaves the other unit of muskets, which fires at the nearest enemy muskets, requiring 8+, reduced by 1 for having support from the other Parliamentarian musket unit. I roll 8, meaning the Royalist muskets are demoralised and retreat one hex.
It is looking good for the Parliamentary cause
Things take a turn for the worse for the AI when it fails to rally either of the demoralised musket units, meaning one retreats off the battlefield and the other reaches the battlefield edge.
The remaining musketeers at last advance down from the higher ground where they have spent the rest of the battle.
The right-flank pikes charge my pikes in the wood, meaning the normal 8+ becomes a 9+, but the AI rolls a 7.
The left-flank pikes chase after my fleeing cavalry.
The Royalists are short of units ... and of coordination

Wednesday, February 08, 2023

Battle Of Edgehill Play-Through: Turn Four

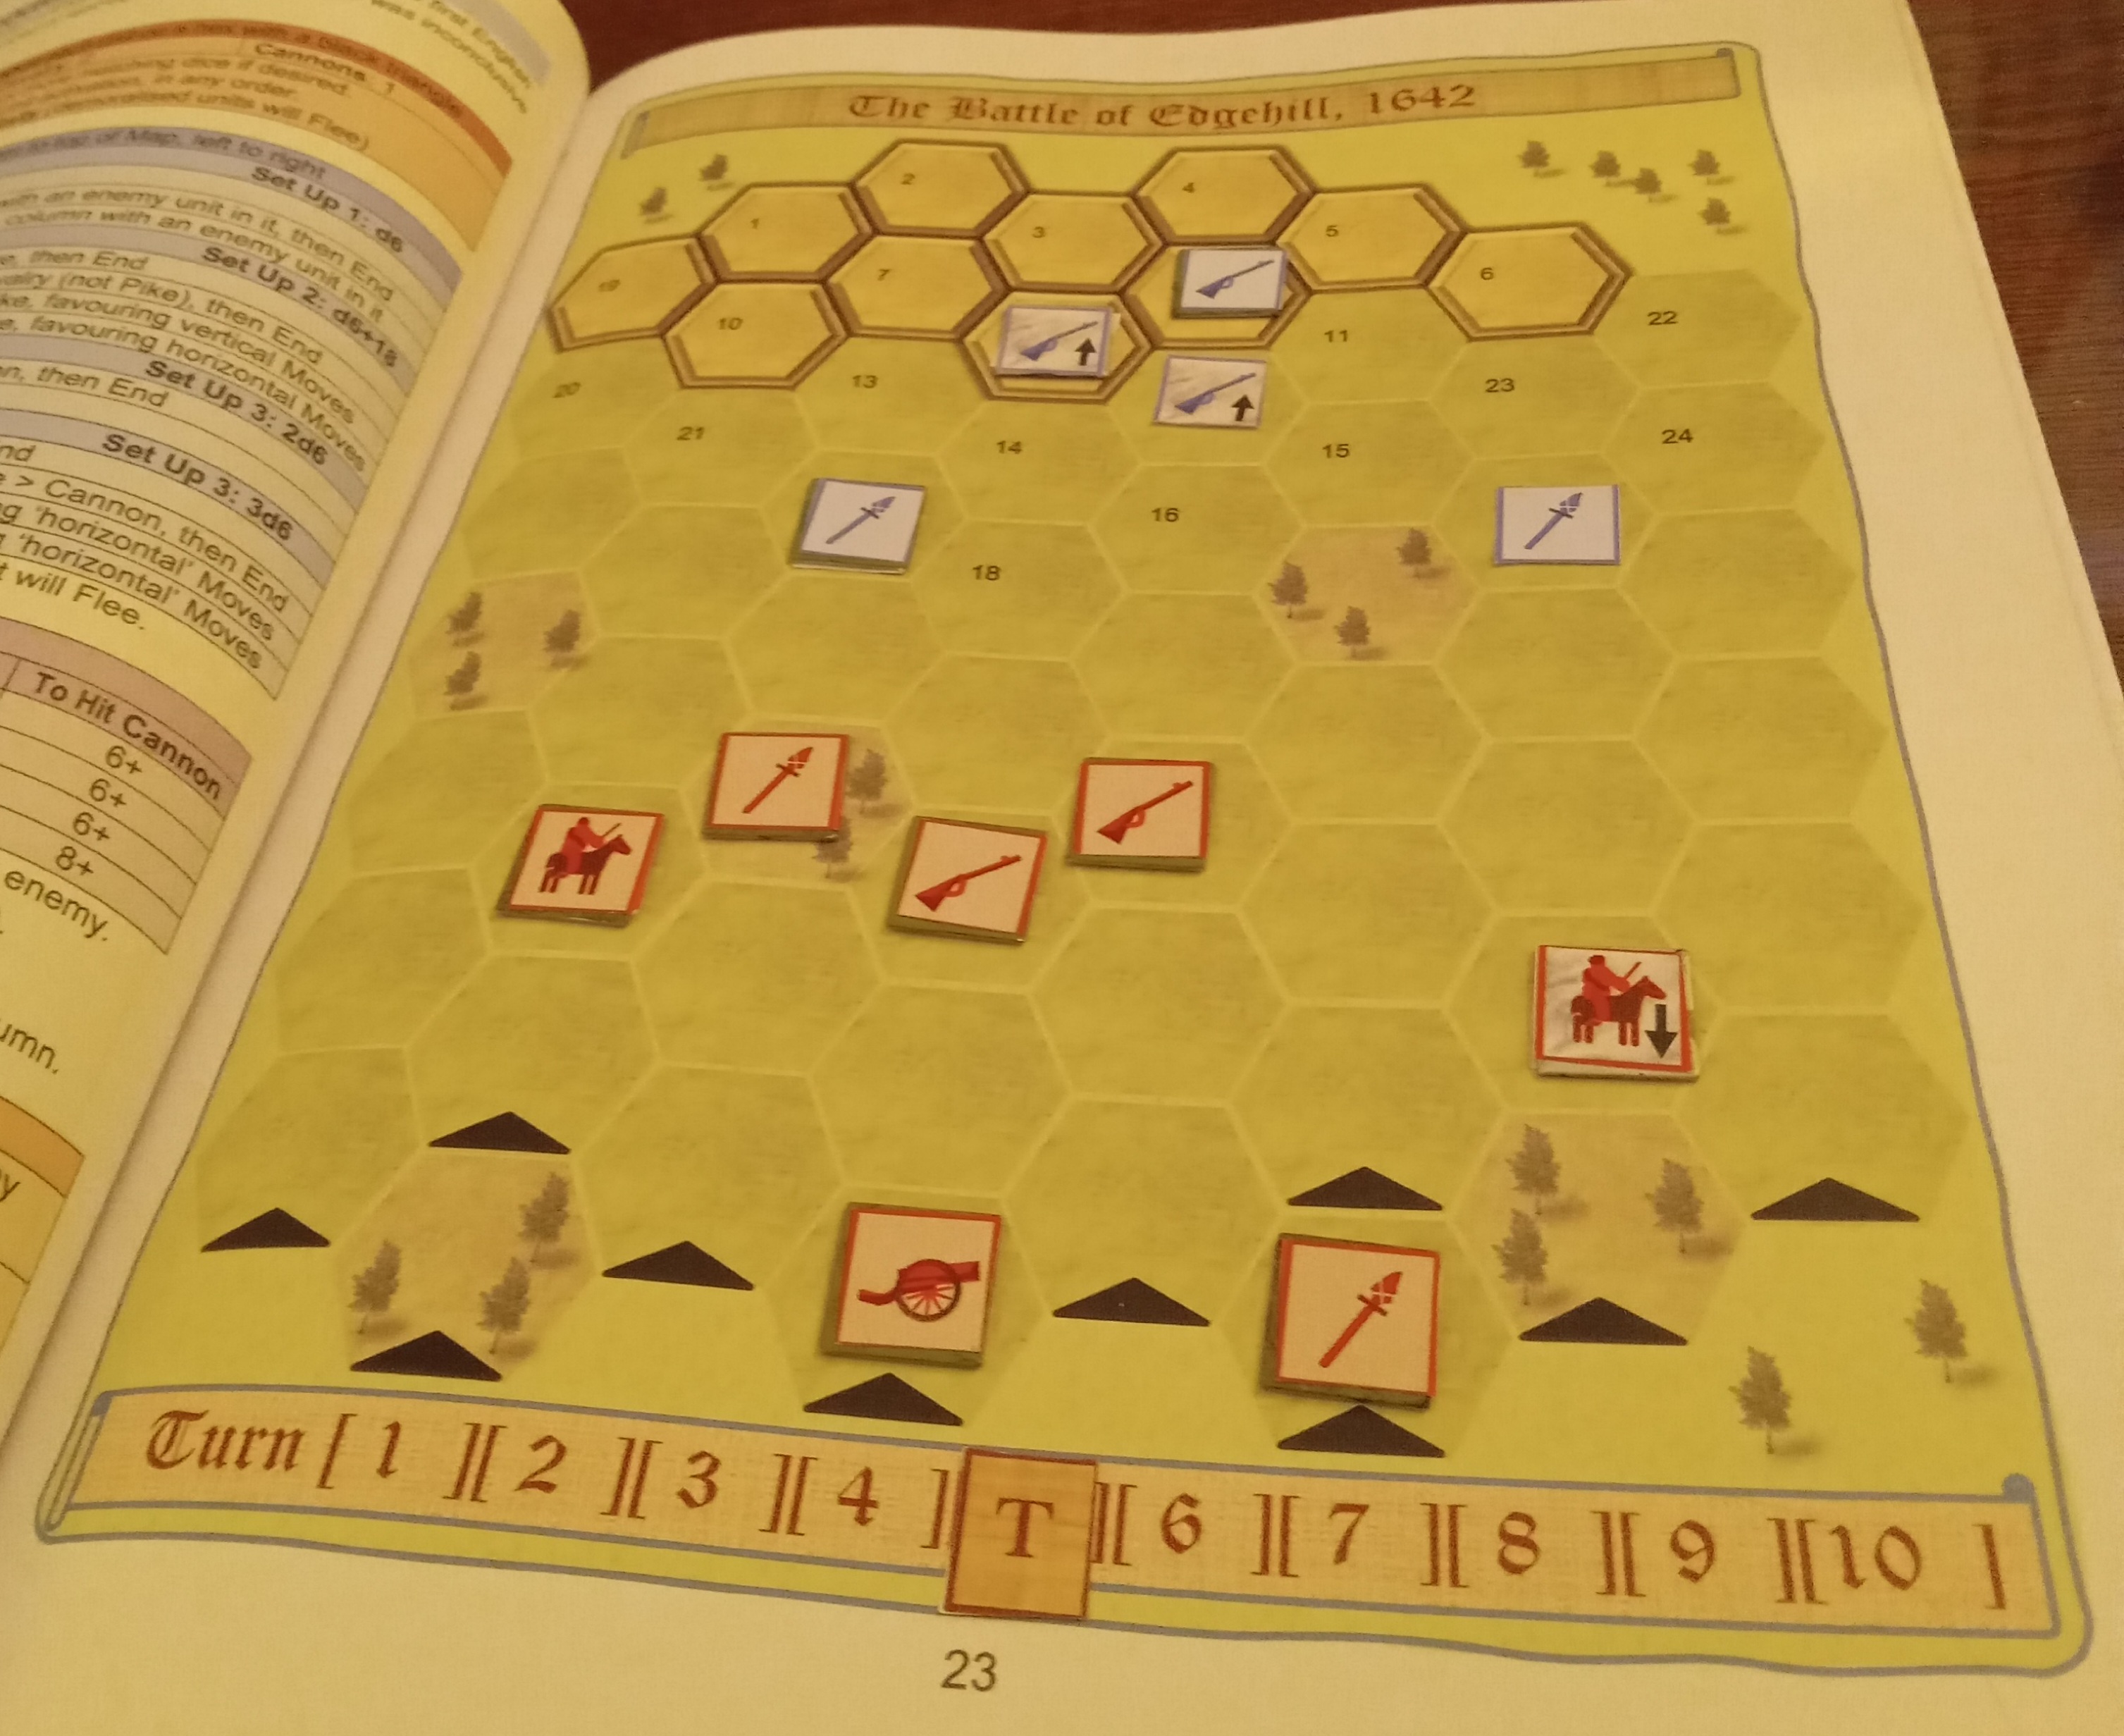
Situation at the start of turn four
My seven dice give me a 6, a 5, two 4s, a 3, a 2 and a 1.
I know I will use the 6 to rally my demoralised musketeers (only a 6 will do this for a human-controlled unit), and I allocate the 5 to the artillery.
I re-roll the 4s, but get two 6s, so effectively no change. I give one of these 6s to the other musket unit, and the move-order dice to both the pike units and the right-flank cavalry. This leaves me with a useless 6, but one cannot have everything.
Dice allocated
After rallying the demoralised musketeers, I shoot the artillery at the nearer pike unit in its line-of-fire.
This requires 7+ for a hit, reduced to 5+ thanks to support from two units of muskets (both are within their three-hex range of the pikes).
I roll a 7, demoralising the pikes and forcing them to flee two hexes (the difference between the hit score required and the actual die roll), leaving them on the edge of the battlefield as they have to pass through the two units in their line of retreat.
I then advance the right-flank pikes into the trees and charge the enemy pikes. This requires 8+ for a hit, but reduced to 6+ thanks to support from a unit of muskets and a unit of cavalry. Unfortunately I roll a 2.
I next move the right-flank cavalry so it can charge the same pike unit. Cavalry need 9+ against pikes, but this is reduced to 7+ since they are being supported by units of pikes and muskets. Unfortunately I roll a 3.
My left-flank pikes enter the trees in front of them and charge the right flank Royalist cavalry, needing 7+, reduced to 5+ thanks to receiving support from two units of muskets.
My roll of 10 demoralises the cavalry and forces them off the field of battle since they have to retreat five hexes.
My remaining musket unit has no one in range, and so its attack die is wasted.
Royalists are in retreat
The AI fails to rally its remaining cavalry unit (a throw of 5 or 6 with a single die is required), which retreats off the battlefield.
The leading musket unit fires at the Parliamentarian pikes next to it, requiring 8+, reduced by 3 for having support from a Royalist unit of pikes and two of muskets, but increased back by 1 for the target being in trees.
The AI rolls a 10, demoralising my pikes and forcing them to flee four hexes to the bottom edge of the battlefield.
The other Royalist muskets refuse to advance, apparently feeling they are doing their duty offering support from higher ground.
The left-flank Royalist pikes attack my right-flank cavalry, needing 7+, reduced by 1 for having support from muskets.. The AI rolls 6, demoralising the cavalry.
The other morale-good pikes advance, but the demoralised pikes fail to rally and so leave the battlefield.
The Royalist army is down to five units

Tuesday, February 07, 2023

Battle Of Edgehill Play-Through: Turn Three

Situation at the start of turn three
My seven dice give me a 6, three 4s, a 3 and two 1s. I re-roll the 4s but get a 6 and two 5s, which is no improvement as I only need one attack order.
I allocate the 6 to the cannon, and allocate the move dice, ie the 3 and the two 1s, to my right-flank units.
Dice allocated
I start by firing the cannon unit at the pikes directly in its line-of-fire, rolling exactly the 8 needed for a hit, which means the pikes are demoralised but do not flee.
On the right I advance the cavalry and the muskets and then the pikes, with the last named charging the Royalist cavalry in the trees.
Pikes need 7+ to hit cavalry, but here they get support from the Parliamentarian cavalry and muskets, which are both in attack range. That reduces the hit score to 5+, but it rises to 6+ thanks to the defenders being in trees,
I roll 7, so the Royalist cavalry are demoralised and flee one hex.
The Parliamentarian right flank surges forward
The right-flank Royalist cavalry move two hexes towards the Parliamentarian cannon, but the left-flank cavalry fail to rally and so fall back two hexes to the top edge of the map.
The furthest forward Royalist muskets fire at the Parliamentarian right-flank muskets. They need 8+ to score a hit, reduced to 7+ thanks to receiving support from the right-flank cavalry, which is in attack range - two hexes - of the Parliamentarian muskets.
The AI rolls exactly 7, demoralising my muskets but not forcing them to flee.
The furthest-back unit of muskets advances to the edge of the higher ground, where the remaining musket unit waits.
Only one of the Royalist pike units advances, but the demoralised unit rallies on a throw of 6.
Royalists are counterattacking

Monday, February 06, 2023

Battle Of Edgehill Play-Through: Turn Two

Situation at the start of turn two
My seven dice landed with a 6, two 5s, a 4, a 2 and two 1s. I re-rolled the 5s, but got a 6 and a 4, which are still attack orders and so no good at present.
I allocated a 6 to the cannon, the 1s to the musketeers and the 2 to the left-flank cavalry.
Dice allocated
I started by firing the cannon at the Royalist pikes that last turn had kindly moved into line-of-fire, but the two dice only totalled 5, well short of the 8+ needed.
I then moved the musket units up in support of the pike units, and did likewise with the left-flank cavalry.
The Parliamentarian foot and horse have advanced in support of each other
The right-flank Royalist cavalry is the further down the board of the AI's cavalry units, and so it was actioned first, but rolled a 1, meaning it stayed where it was.
The left-flank cavalry rolled a 6, meaning it moved two hexes towards the Parliamentarian cannon, leaving the cavalry in the protection of trees.
Only the furthest forward of the Royalist musket units advanced, but two of the pike units also advanced.
Two of the Royalist musket units have preferred to remain on higher ground

Sunday, February 05, 2023

Battle Of Edgehill Play-Through: Introduction & Turn One

HERE is my first play-through of a battle from Mike Lambo's solo wargaming book on the English Civil War.
In the Battle of Edgehill the human commands Parliamentarian forces, consisting of one cannon unit and two each of cavalry, muskets and pikes.
The AI commands the Royalists, consisting of one cannon unit, two of cavalry and three each of muskets and pikes.
As usual with my battles I will write it up turn-by-turn.
Looking from behind what will be the Parliamentarian lines
I have to set up my forces first, and I am going for a traditional layout with the cannon in the centre, cavalry on the wings and muskets flanked on the cavalry-side by pikes.
Pikes bristling with menace
The AI's set-up is decided by dice throws.
It too went for a fairly traditional layout with cavalry on the flanks and muskets protected by pikes, but with the left flank thrust further forward.
Ready for the off with the rival cannons eyeing each other down a central file
TURN ONE
I roll seven dice, one for each Parliamentary unit, getting two 6s, two 5s and three 3s.
I allocate a 6 to the cannon so it can fire, and re-roll the two 5s, hoping to get move orders (1-2-3 allow movement, 4-5-6 allow an attack). Unfortunately the re-rolls turn up a useless 6 and 5.
I allocate the three 3s to the two pike units and the right-flank cavalry.
Parliamentary dice allocated for turn one with the useless ones discarded
I start by firing the cannon at the Royalist cannon. There are no modifiers, so a simple 8+ is needed with two dice, and I roll 12, meaning the enemy cannon crew are demoralised and flee the field without firing a shot.
I then advance the two pike units, and bring the right-flank cavalry in touch with the right-flank pikes, but slightly behind them.
Situation after the first Parliamentary turn
Now the AI gets its chance.
The Royalist cannon is no more, so the left-flank cavalry is first into action. It has to roll a die, but a 1 means it does not move, perhaps shocked at the early demise of King Charles' artillery.
The other cavalry unit is made of sterner stuff, rolling a 3, meaning it moves two hexes towards the nearest enemy muskets.
Two of the Royalist musket units also advance, as do the two right-flank pike units, but the left-flank pike unit, like the adjacent left-flank cavalry, stays still.
Situation at the end of turn one (including me remembering to add the turn tracker - let's hope that is the only rule I forget)