Saturday, September 30, 2023

Battle Of Vimeiro - Allied Playthrough: Setup & Turn One

THE Battle of Vimeiro occurred four days after the Anglo-Portuguese victory at Roliça.
A French army under General Jean-Andoche Junot attacked, but was defeated by, Sir Arthur Wellesley's men.
In the fifth scenario in Mike Lambo's Battles Of Napoleonic Europe, the Allies advance from the bottom of the map and have to be holding the village of Vimeiro at the end of turn 10
The human player takes on the persona of Wellesley, and has four units of infantry, one of cavalry and one of artillery, all of which must be placed below the dashed red line.
My plan is to advance across the hill next to Vimeiro with three units of infantry, my cavalry and Wellesley
The artillery will move to the forward edge of the allied-controlled hill, firing from there while supported by a unit of infantry.
I realise my plan may have to change, depending on the initial disposition of the French forces.
General Junot - the book wrongly describes him as Marshal a title Napoleon denied him, not least because of his defeat at Vimeiro - has eight units of infantry, two of cavalry and one of artillery.
The French infantry and artillery start in assigned hexes, but the placement of the cavalry and Junot is diced for
TURN ONE
My activation dice land 6, 5 and 3. I reroll the 5, but get another 3. I change the wildcard 6 into a 4.
I advance my main body of infantry obliquely forward to their right, and the cavalry two hexes in the same direction.
The AI's four dice land 6, two 4s and 2. The 6 and a 4 are rerolled, giving another 4 and 3.
The cavalry in area 2 roll 3, advancing two hexes. The infantry in area two advance, although the further-forward unit does it obliquely to their left.
Both units in area 3 roll 3, but only one can follow the instruction of advancing straight down.
The cavalry in area 4 roll 2, which would only result in movement if there were enemy within three hexes. The infantry in area 4 also roll 2, which results in them moving nearer to Vimeiro.
The artillery roll 6 but cannot follow the instruction of moving straight down. Junot advances so he is adjacent to four friendly units.
The first clash of arms should occur next turn

Friday, September 29, 2023

Summing Up Cropredy Bridge

WITH the benefit of hindsight my decision to concentrate all my forces around one bridge was a fundamental mistake.
Hindsight should not have been necessary - a little sensible foresight ought to have been enough.
I was able to inflict quite high casualties on the Royalists, but the one-bridge bottleneck meant I was always likely to run out of time.
The AI now leads our series 7-3.

Thursday, September 28, 2023

Cropredy Bridge Playthrough: Turn Eight

Situation after turn seven
My five dice give me 4, 3, two 2s and 1.
I decide I have to take the opportunity to fire from the bridge while the enemy are lined up in a file to the edge of the battlefield, so I allocate the 4 to the forward muskets and move-dice to the other units.
The forward muskets fire at the nearer Royalist muskets, needing 8+, increased to 9+ thanks to firing through trees, but I roll 6.
I finish by advancing the pikes along the river bank, and moving the artillery onto the same file of hexes as the forward Royalist pikes.
Halfway through turn eight and I still have not established any troops across the river
The forward Royalist muskets fire at my men on the bridge, needing 8+, increased to 9+ by the trees, and roll 10, demoralising my unit and sending it fleeing to the edge of the battlefield.
The other Royalist muskets remain on the high ground, the forward pikes take cover in trees and the other pikes advance to the edge of the high ground.
The Parliamentarian side in this battle is clearly a lost cause, and so I concede 

Wednesday, September 27, 2023

Cropredy Bridge Playthrough: Turn Seven

Situation after turn six
My five dice give me 6, 4, 3 and two 1s.
I allocate attack-dice to the artillery and left-flank pikes, and move-dice to the remaining units.
First I fire at the pikes in the line-of-sight of my artillery, needing 8+, but roll 5.
Then I send the rearward muskets on to the bridge, and move the horse behind them.
Time is running out for the Parliamentarians
The forward Royalist muskets fire at my men on the bridge, needing 8+, increased by one thanks to firing through trees, but roll 4.
The rearward Royalist muskets should advance towards my pikes, but cannot do so as moving obliquely forward would not bring them closer.
The forward Royalist pikes advance towards my pikes, taking the Royalist unit off the file my artillery is on, but the other Royalist pike unit stands still.
This has been a very quiet turn

Tuesday, September 26, 2023

Cropredy Bridge Playthrough: Turn Six

Situation after turn five
My five dice give me 6, 5, 4 and two 3s.
I allocate attack-dice to the muskets and the horse, and move-dice to the pikes and artillery.
I start by moving the pikes to their left and the artillery to their right.
Then the backward muskets fire at the foremost pikes, needing 8+, reduced by two thanks to support from muskets and artillery, and I roll 8, demoralising the pikes and forcing them to flee two hexes.
My other muskets fire at the pikes in trees, needing 8+, increased by one thanks to the trees, but decreased by one thanks to support from my other muskets, and I roll 9, demoralising the muskets and forcing them to the edge of the battlefield.
The Royalists are reeling, but time is on their side
Neither Royalist musket unit advances, the backward unit because it could not get closer to the Parliamentarian unit it was required to approach. But both Royalist pike units rally.
Quite a gap has opened between the two armies

Monday, September 25, 2023

Cropredy Bridge Playthrough: Turn Five

Situation after turn four
My six dice give me 6, two 5s, 4 and two 3s.
I allocate the 6 to the horse, the 5s and 4 to the muskets and artillery, and the 3s to the pikes.
First I rally the horse, then use the artillery to fire at the nearest Royalist pikes, needing 8+, reduced by one thanks to support from pikes and two more thanks to support from muskets, and I roll 7, demoralising the pikes and forcing them to flee two hexes.
My forward muskets fire at the muskets in the trees, needing 8+, reduced by two thanks to support from pikes and muskets, but increased by one thanks to the trees. I roll 3.
My other unit of muskets fires at the same target, also needing 7+, and I roll 9, demoralising the Royalist muskets and forcing them back two hexes.
I decide to leave the forward pikes on the bridge, so they cannot be charged by Royalist pikes.
The Royalists face a critical half-turn in which much of their army could flee the battlefield
The foremost Royalist muskets fire at my pikes on the bridge, needing 8+, and they roll 9, which destroys the pikes as there are no retreat squares they can use.
The demoralised muskets fail to rally and so flee the battlefield, but the rearmost muskets advance.
The two furthest-forward pikes advance obliquely one hex, but the demoralised pikes next to them fail to rally and so have to leave the battlefield.
This is followed by the other demoralised pikes also failing to rally, and so leaving the battlefield.
The Royalist army now has fewer units than the Parliamentarians

Sunday, September 24, 2023

Cropredy Bridge Playthrough: Turn Four

Situation after turn three
My six dice give me 6, 5, 3, two 2s and 1.
I allocate move-dice to all but the artillery and backward pikes.
First I take quite a risk by using the horse to charge the muskets in the trees. I need 6+, increased by one thanks to the cover, but I roll 6.
My artillery fire at the pikes in their line-of-sight, needing 8+, and roll exactly 8.
I advance the forward pikes onto the bridge, with the muskets close behind them.
Am I about to lose my last unit of horse?
The muskets in the trees fire at my horse, needing 9+, reduced by one thanks to support from other muskets, but roll 4.
The second unit of muskets fires at the same target, also needing 8+, and roll 11, demoralising my horse and sending them to the edge of the battlefield (fortunately their route did not take them into the river, as they would have been destroyed).
The rearward muskets at last advance, albeit obliquely, as do the three good-morale units of pike, but their demoralised comrades fail to rally and so flee to the edge of the battlefield.
The Royalists are well-placed to attack anyone crossing the Parliamentarian-held bridge

Saturday, September 23, 2023

Cropredy Bridge Playthrough: Turn Three

Situation after turn two
My six dice - I have lost a unit - give me 6, two 5s, 4, 2 and 1. I reroll the 5s but get two more 5s.
I allocate one attack-die to the artillery, and ensure the left-flank pikes have one of the move-dice.
My artillery fire at the fleeing Royalist horse, needing 9+, reduced by one thanks to the target being demoralised. I roll exactly 8, destroying the horse as they have been hit while demoralised.
My other units stand still, except for the left-flank pikes which move to their right.
Again I am waiting for the Royalists to approach 'my' bridge
Only the foremost Royalist muskets advance, together with two of their pike units.
The most-advanced Royalist muskets have taken cover in trees

Friday, September 22, 2023

Cropredy Bridge Playthrough: Turn Two

Situation after turn one
My seven dice give me 5, two 4s, two 3s and two 1s.
I allocate the attack-dice to the artillery and muskets, and the move-dice to the remaining units.
I start by firing the artillery at the horse in their line-of-sight, needing 9+, rolling exactly 9, and so demoralising the Royalists.
Then the rearward muskets fire at the other Royalist cavalry unit, needing 9+, reduced by three thanks to support from two units of horse and one of muskets, but I roll 5.
The other musketeer unit fires at the same target, also needing 6+, but also roll 5.
Then my rearward horse charge the Royalists, needing 8+, reduced by two thanks to support from two units of muskets (my other horse cannot support as they cannot cross the bridge while it is occupied), and I roll 10, demoralising the Royalists and sending them fleeing to the edge of the battlefield.
Both my pike units move rightwards, and the unmoved horse stand pat.
I have captured a bridge and sent the Royalist horse fleeing, but my horse on the bridge are looking very vulnerable, especially as they have no retreat squares, a fact I have only just realised
Neither of the Royalist cavalry units rally (both rolled 1), so one exits the battlefield and the other comes within one turn of doing so.
The foremost Royalist muskets fire at my horse on the bridge, needing 9+, reduced by one thanks to support from another unit of muskets, but roll 5.
That other unit of muskets fires at the same target, also needing 8+, and they roll 9, eliminating my horse.
The rearward Royalist muskets again stand still, but two of the pike units advance.
The river still divides the two armies (and I have remembered to move on the turn counter)

Thursday, September 21, 2023

Cropredy Bridge Playthrough: Introduction & Turn One

THE 10th refight in Mike Lambo's English Civil War book is the Battle of Cropredy Bridge, an indecisive engagement in Oxfordshire in June 1644.
The human commands the Parliamentarians, attacking from the bottom of the map
The Parliamentarians consist of a unit of artillery and two units each of horse, muskets and pikes.
The river can only be crossed by the two bridges, but nevertheless victory only comes if every Royalist unit is removed or demoralised before the end of turn 10.
Nothing subtle about this setup - I am going all out on the right flank
The AI's Royalists consist of two units of horse and four each of muskets and pikes. Their setup is determined by dice throws.
The Royalist horse are on the same flank as their Parliamentarian counterparts
TURN ONE
As usual I will write up the refight as I go along.
My seven dice give me 6, 5, 3, 2 and three 1s.
I allocate the attack-dice (6-5) to the artillery and the left-flank pikes, and give move-dice (3-2-1) to the other units.
The artillery open fire on the muskets in their line-of-sight, needing 8+, rolling 9, which sends the Royalists fleeing from the battlefield.
I move the horse forward one hex each and shuffle the foot rightwards (apart from the left-flank pikes, who do not have a move-die).
I am waiting for the Royalists to approach so my horse can hopefully charge them while supported by musketeers
The Royalist horse advance, each moving two hexes obliquely to their right.
The foremost Royalist muskets cannot attack anyone, and their die roll is a 5, meaning they should move "towards nearest [enemy] unit, favouring 'horizontal' moves."
Three of my units - the two horse by the bridge and the pikes next to them - are equidistant, but should the fact the pikes are behind impassable terrain, ie the river, rule them out as not being equally near?
I am fairly confident the answer is that the nature of terrain should not make a difference, and that is how I will play it.
Accordingly I roll a die, which determines the Royalist muskets should head for the pikes, and so they move one hex directly down the map as a 'horizontal' move would not take them closer.
The left-flank muskets also advance, but the rearward muskets, although rolling a 4, stand still as they cannot get closer to their intended target, which is also my pikes by the horse.
All four units of Royalist pikes advance.
The righthand bridge is surely set to be the centre of desperate fighting

Wednesday, September 20, 2023

Summing Up My French Playthrough Of The Battle Of Roliça Part Two

I HOPE I do not seem like a bad loser, but I believe this scenario is an all-but-impossible task for the human player.
So it it is just as well I was 2-1 up in my series against the AI, as at least now I am level, and there are 16 battles to go.

Tuesday, September 19, 2023

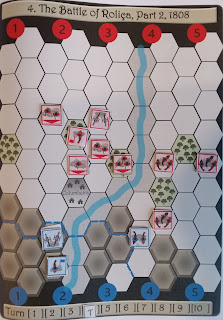
Battle Of Roliça Part Two - French Playthrough: Turn Six

Situation after turn five
I roll 2 and two 1s as my activation dice. I reroll a 1, getting a 4, meaning all my units can be activated.
My artillery fire at the infantry in the river, the three dice being increased for being on high ground, for being at close range and for being next to General Delaborde. I roll three 6s, 5, 2 and 1, destroying the Allied unit. Delaborde bravely charges the infantry in Columbeira, his four dice being reduced by one for the enemy being in cover. I roll 6, 4 and 3, eliminating the enemy one-strength unit.
My cavalry charge the infantry next to Columbeira. The five dice are reduced by one for attacking from a river, resulting in 6, two 5s and 4, eliminating the infantry.
The Allies have suffered heavy casualties, but only need to eliminate one more of my units to win
The AI's activation dice land 6, 4 and two 3s. The 6 and 3 are rerolled, landing 2 and another 6.
Sir Arthur Wellesley stays in the protection of trees. The infantry in area 2 fire at General Delaborde. Their two dice are increased by being next to Wellesley, and they land 5, 4 and 3, which is enough to kill the general and, by reducing my army to fewer than three units, win the battle.

Monday, September 18, 2023

Battle Of Roliça Part Two - French Playthrough: Turn Five

Situation after turn four
My activation dice are two 5s and 2. I reroll the 5s, which become 4s, meaning I can activate all my (three) units.
My cavalry continue their melee against the forward Allied cavalry. My three dice land 5, 4 and 1, meaning the enemy unit is reduced to two-strength and falls back into the protection of the trees.
My artillery fire at the Allied cavalry obliquely forward to their right. My two dice are increased through being on high ground and for being next to the commander. I roll 5, two 4s and 2, reducing them to two-strength and forcing them back two hexes. General Delaborde moves forward obliquely to the left.
My cavalry still look very vulnerable
The AI's activation dice are 5, 3, 2 and 1.
The forward infantry in area 2 roll 6, meaning they occupy Columbeira and fire at my artillery. Their two dice are reduced for firing after moving, but they roll 6, reducing my unit to one-strength. Sir Arthur Wellesley stands still. The two-strength infantry in area 2 roll 5, but that requires them to advance obliquely to their left, which is impossible as that hex is occupied by Wellesley.
The infantry in the trees advance one hex and fire at my cavalry. Their three dice are reduced for firing after moving and for firing while in a river, and they roll 1. The other infantry in area 3 advance a hex, while the artillery remain where they are (a roll of 1 meant they could only move if it put them in line of sight and range of the enemy).
The left-flank cavalry roll 3, advancing two hexes towards my cavalry.
The Allied troops are closing in

Sunday, September 17, 2023

Battle Of Roliça Part Two - French Playthrough: Turn Four

Situation after turn three
My activation dice land 6, 5 and 3. I reroll the 5 and 3, getting two 1s. I turn the wildcard 6 into a 2.
My artillery fire at the cavalry in the river. My two dice are increased for being on higher ground and for being next to General Delaborde. I roll 6 and three 3s, eliminating the one-strength enemy.
Delaborde falls back one square obliquely left.
My infantry advance and fire at the infantry to their front. My two dice are increased for being on higher ground, but decreased for firing after moving. I roll 6 and 4, eliminating the one-strength enemy.
The Anglo-Portuguese are suffering casualties. but keep on coming
The AI's activation dice are 6, 4 and two 1s. The 6 and a 1 are rerolled, becoming 5 and 2.
The one-strength Allied infantry fire at my infantry. Their two dice are increased by being next to Sir Arthur Wellesley, and they roll 5, 3 and 1, eliminating my one-strength unit (if I lose another unit I will have lost the battle). Wellesley stands still, and the two-strength infantry in area 2 advance a hex.
The forward cavalry in area 4 roll 2, meaning they advance two squares and attack my cavalry. Their four dice land 6, 3, 2 and 1, reducing my unit to two-strength. The other cavalry in area 4 roll 5, advancing two hexes.
The cavalry in area 5 roll 1, meaning they stand still.
Numbers must surely prevail, and soon

Saturday, September 16, 2023

Battle Of Roliça Part Two - French Playthrough: Turn Three

Situation after turn two
My activation dice are 6 and two 5s. I reroll the 5s and get 6 and 2, meaning, thanks to the wildcard 6s, I can activate all my units.
I start by advancing the two-strength infantry to the edge of the hill, from where they fire at the further-forward allied infantry in area 2. My three dice are increased by being on higher ground, but decreased for firing after moving. I roll 5, 4 and 2, which, since the enemy unit has no retreat squares available, means it is is reduced to one-strength. My left-flank infantry also advance to the edge of the hill, and they fire at the same target, getting two dice after modifications for being on higher ground and for firing after moving. I roll a disappointing 3 and 2.
My artillery fire at the infantry to their front. My three dice are increased for being on higher ground, for being next to General Delaborde and for firing at closer than four hexes. The dice land 5, three 4s, 2 and 1, reducing the enemy unit to two-strength and sending it fleeing to the edge of battlefield. Delaborde stands still.
My cavalry charge the nearest allied cavalry. My four dice land two 5s, 2 and 1, reducing the enemy to one-strength. My right-flank infantry fire at the infantry directly to their front. My two dice are increased for being on higher ground and for being next to the commander. I roll a very disappointing 3, two 2s and 1.
My cavalry will do very well to survive the next half-turn
The AI's activation dice are two 3s, 2 and 1. One 3 is rerolled but becomes a worthless - to the AI - 6.
The infantry in area 1 roll 6, advancing a hex and firing at my left-flank infantry (chosen over the unit next to it for being further up the map). The two dice are reduced for firing after moving, but 5 is rolled, eliminating my unit.
The one-strength infantry in area 2 fire at my two-strength infantry (my cavalry are at the same range, but infantry prefer firing at other infantry). Their two dice are increased for being next to Sir Arthur Wellesley, and they roll 5, 4 and 2, reducing my unit to one-strength and forcing it back a hex. Wellesley remains in the trees, while the badly-shaken two-strength infantry advance a hex.
The infantry in trees in area 3 fire at my cavalry, rolling 4, 3 and 2, forcing my men back  a hex. The two-strength infantry in area 3 fire at my infantry in front of them, their three dice being increased thanks to the presence of Wellesley. They roll two 5s, 4 and 1, eliminating my unit. The artillery roll 4, but remain where they are as they cannot move straight down.
I have lost two units in one turn, although my bold cavalry survived unscathed

Friday, September 15, 2023

Battle Of Roliça Part Two - French Playthrough: Turn Two

Situation at the end of turn one
My activation dice land 3, 2 and 1, so again I can activate the whole of my army.
I move Delaborde into the river so he is adjacent to the infantry in area 3. The artillery do not have a target and I choose not to move them.
The infantry in area 3 fire at the nearest allied infantry. My four dice are increased for being on higher ground and for being next to the commander, but I roll a disappointing 4, 3, two 2s and two 1s. The only good news is that the enemy unit does not have a retreat square, and so instead loses a strength point. My cavalry in area 3 stand still.
My three-strength infantry in area 1 advance to the edge of the hill and fire at the infantry ahead of them. My four dice are increased by being on higher ground but decreased for firing after moving. I roll 6, 5, 4 and 3, reducing the enemy to one-strength and forcing it back a hex. The tiebreaker for which hex to retreat to is resolved by option six, which is to move nearer to area 3. My one-strength infantry stand still.
The main body of the allies looks like the V formation of birds in flight
The AI rolls 5, 4, 3 and 2, meaning that all units apart from the one-strength infantry will be activated.
The infantry in the tress advance a hex and fire at my nearest infantry, their four dice being reduced for firing after moving. They roll two 3s and 2. The other infantry in area 2 also advance and fire at the same target, rolling 5, 4 and 1, reducing my unit to two-strength and forcing it back a hex. Wellesley advances into the trees, putting him adjacent to four units.
The two-strength infantry fire at my infantry on the central hill, their three dice being increased thanks to the presence of the general. They roll two 4s, 2 and 1, but the retreat dice are ignored because my men are next to General Delaborde. The three-strength infantry in area 3 advance into the trees and fire at the same target, their four dice being reduced for firing after moving. They roll 6, 5 and 2, causing my unit to lose two strength points. The artillery want to move obliquely forward but cannot as they can only do so if it puts them in range and line of sight of the enemy.
Both cavalry in area 4 advance two hexes, as do the cavalry units in area 5, except here, because they roll different numbers, the rearward unit moves forward obliquely instead of straight.
I have not lost a unit in the very early going, but two have been reduced to one-strength

Thursday, September 14, 2023

Battle Of Roliça Part Two - French Playthrough: Setup & Turn One

THE fourth scenario in Mike Lambo's Battles Of Napoleonic Europe is part two of the Battle of Roliça, which is fought from the French side.
The human player, in addition to General Delaborde, receives three units of infantry and one each of cavalry and artillery, all of whom have to be placed below the blue dashed line
To win the battle I must have three units survive to the end of turn 10.
It is hard to know what else to do but occupy the high ground and hope the Allies do not coordinate their attack very well
The AI gets Sir Arthur Wellesley, along with six units of infantry, four of cavalry and one of artillery.
The dispositions of the allied infantry and cavalry are fixed - only the starting positions of the commander and the artillery are randomised 
TURN ONE
My three activation dice give me 6 and two 1s. I reroll a 1, getting 3, which means that, by changing the wildcard 6 into a 2, I can activate units in areas 1, 2 and 3, which covers all my units - not that there is much to do so early in the battle.
I start by firing my artillery at the infantry in their line of sight. My three dice are increased by one through being on higher ground and a further one for being next to the general. I score three hits by rolling three 5s, along with 3 and 1, eliminating the allied unit. Delaborde stands still.
My left-flank infantry advance a hex and fire at the allied infantry ahead of them. My four dice are increased by one for being on higher ground, but reduced by one for firing after moving and one more for firing through trees. I roll two 6s and 4 - the 6s reduce the allied unit to one-strength, and the 4 forces it back a hex. My other infantry in area 1 stay where they are, as do my units in area 3.
The Anglo-Portuguese right flank has suffered a setback 
The AI's four activation dice are 6, 4, 3 and 2. The 6 is rerolled, becoming 1, meaning all of the army but the left-flank cavalry in area 5 will be activated.
The three-strength infantry in area 1 advance and fire at my furthest-forward infantry. Their four dice are reduced by one for firing after moving. They roll 6, 5 and 4, reducing my men to one-strength and forcing them back a hex. The other infantry in area 1 move behind the larger unit.
The infantry in area 2 advance into the trees. Wellesley advances a hex to be adjacent to three units.
Both infantry units in area 3 advance a hex, with the further-forward unit firing at my infantry on the central hill. Their four dice are reduced by one for firing after moving, and they roll 3, 2 and 1, which means no hits. The artillery also advance.
The forward cavalry in area 4 roll 1, meaning they stand still, but their comrades roll 4, and so move along the river to get closer to my infantry on the central hill.
I almost lost a unit on the first turn, which would have been a severe blow

Wednesday, September 13, 2023

Two Crackers

A TRIP to the Devon coastal resort of Torquay earlier this month found me with more spare time on my hands than I was expecting.
Accordingly I was able to finish one very interesting book,  and both start and finish another.
Pair of gems
I admit neither has exactly an inspiring cover, especially Sand, Wind, And War by Ralph A Bagnold,
Subtitled Memoirs Of A Desert Explorer, this is the autobiography of a man who rose to the rank of brigadier in the British army as well as winning numerous top scientific awards.
The American space agency Nasa named Bagnold Sands on Mars in recognition of his work in understanding how dunes form and move.
Bagnold's military achievements included organising the Long Range Desert Group, which raided extensively behind enemy lines in the Western Desert campaign of WW2.
I was so impressed by Bagnold's book Libyan Sands - Travel In A Dead World that I happily, more-or-less, splashed out £24.53 on Sand, Wind, And War, and I have not regretted it.
The more-substantial Britain BC - Life In Britain And Ireland Before The Romans was decidedly cheaper at £2 from a charity shop.
There is not much military history in the book - author Francis Pryor is an archaeologist who follows the modern fashion of pooh-poohing many claims of ancient upheavals caused by clashes of arms.
But his knowledge of and passion for the subject shine through, although Pryor does warn that, perhaps paradoxically, the longer back in time one goes, the more chance there is that established 'truths' will be overturned.
Because I live in a relatively small flat, I quite often have clearouts of books, but I suspect it will be a long time before I give up either of these.